
Setting Up From Scratch
Tarek Cheikh
Founder & AWS Cloud Architect
Now that you know what the service does and the vocabulary of what it finds, here is how to set it up, and where the documentation leads you astray.
I went through this setup documenting every screen, every field, and every policy JSON the console showed me. What follows is what actually happened, not what the documentation says should happen. The whole process took about 15 minutes, including the time I spent debugging a domain verification failure. Without that detour it would have been under 10.
Prerequisites
You need very little to start:
- An AWS account. Any account type works. If you are in an organization, use an account where you have administrative access to IAM.
- IAM permissions to create roles. The setup can create a default role for you, but you need permission to let it. If your account has restrictive Service Control Policies, confirm that IAM role creation is allowed.
- Access to us-east-1 for the control plane. As of this writing (June 2026) the service runs in six regions (us-east-1, us-west-2, eu-west-1, eu-central-1, ap-southeast-2, ap-northeast-1), and AWS may add more over time. In my testing, Agent Space creation and the IAM Identity Center association ran through us-east-1, and the inference appeared to stay in-geography (EU to EU, US to US, AUS to AUS); AWS does not publish these control-plane details, so treat them as observations rather than documented behavior. Note also AWS's documented position on cross-region inference: your data remains stored only in the region where the request originated, but input prompts and output results may be processed outside that region, so do not rely on inference staying in-geography. Your target application can run anywhere.
- A domain you control with DNS access, if you plan to run penetration tests. You do not need a target application for design reviews.
- A web browser. At the time of this walkthrough, in the preview window before the March 31, 2026 GA, the entire setup happened through the AWS Management Console, with no CLI path. AWS has since published a full
aws securityagentCLI, including setup commands likecreate-agent-spaceandcreate-target-domain, so a console walkthrough is no longer the only option. This post still documents the console path, since that is what I actually used and screenshotted.
The setup page lives at:
https://console.aws.amazon.com/securityagent/Pick your working region in the console region selector before you start; the service is available in the six regions listed under the prerequisites above. The page is divided into three sections on a single screen: Agent Space configuration, user access configuration, and service access.
Creating an Agent Space
An Agent Space is the workspace where everything lives: your domains, roles, test configurations, findings, and reviews. Think of it as a project folder scoped to a single application. You can have up to 100 Agent Spaces per account per region, but each one should represent one application, or a set of microservices that share a single attack surface behind one API gateway.
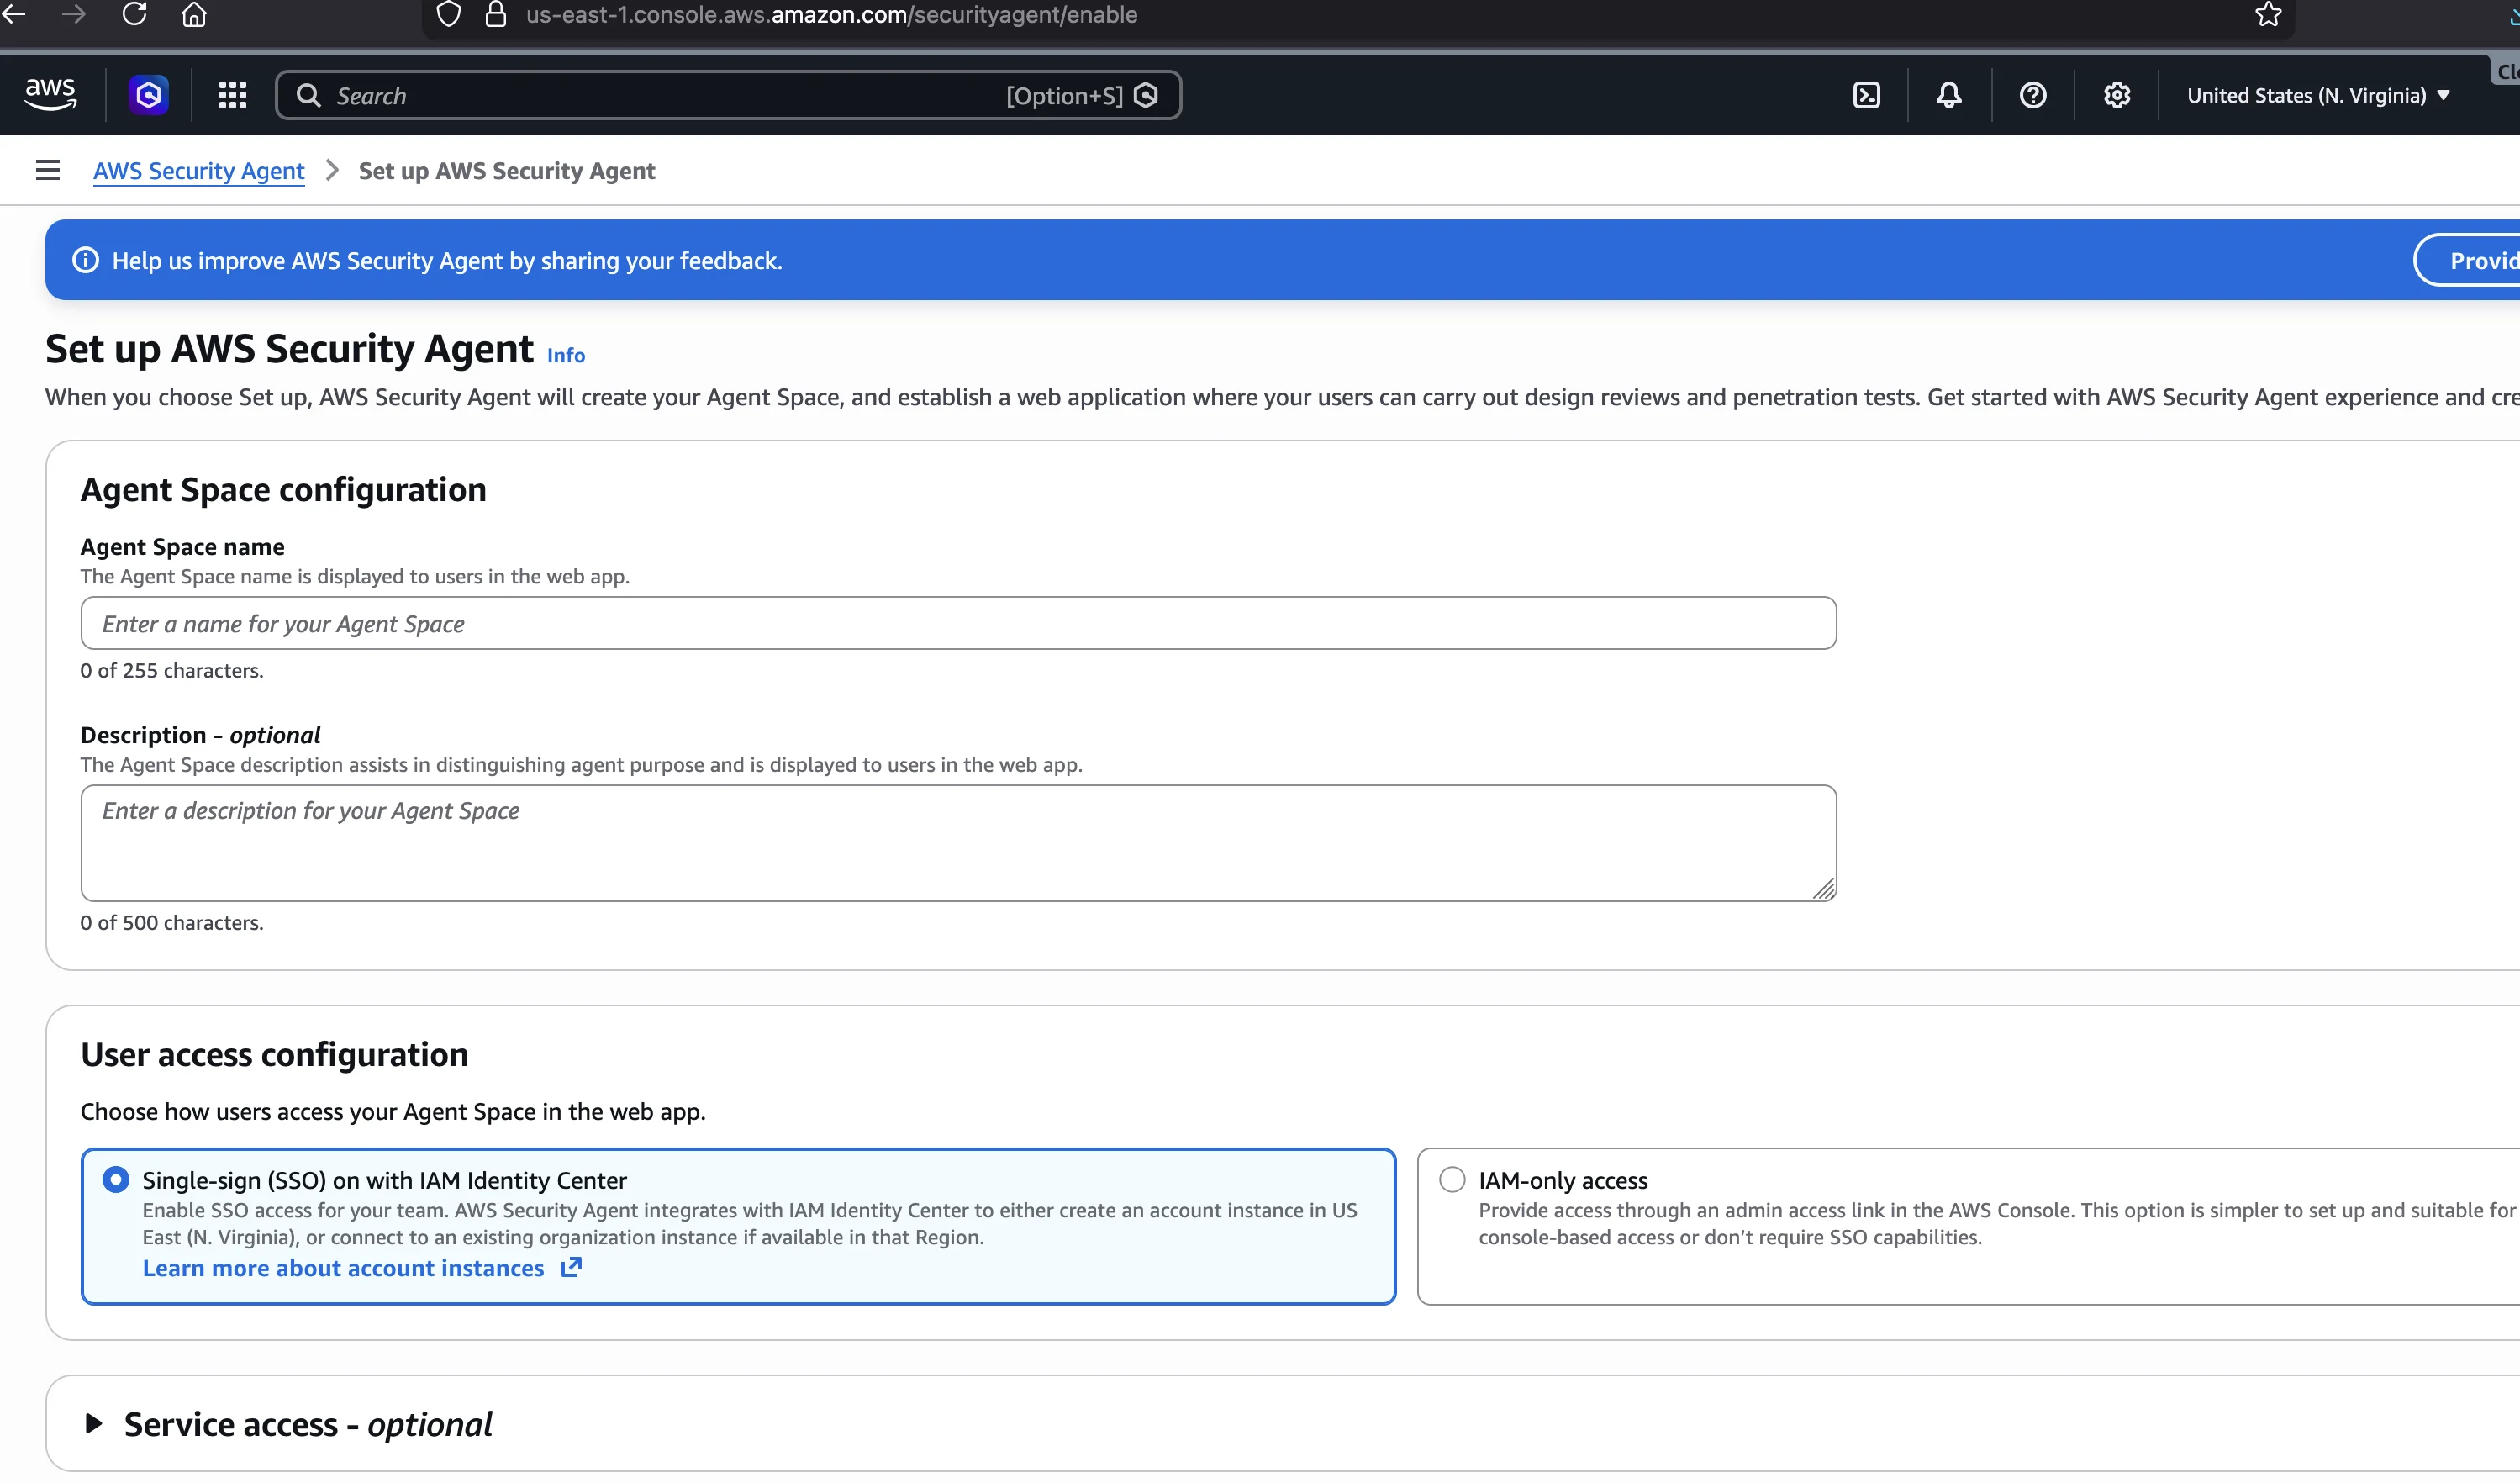
The first section has two fields:
| Field | Type | Details |
|---|---|---|
| Agent Space name | Required | Names the workspace. I used secagent-lab. |
| Description | Optional | Describe the application: its tech stack, auth method, and sensitive operations. |
For the description, treat this like a briefing for a human pentester. A good one might read: "Security research lab for testing AWS Security Agent capabilities against a Python Flask web application with intentional vulnerabilities. The application uses JWT for authentication and exposes search, upload, and user management endpoints."
Choosing an Access Method
The second section is where you pick how users authenticate to the console. You have two options, and this choice is permanent.
| Option | Details |
|---|---|
| Single sign-on (SSO) with IAM Identity Center | Better for teams already using Identity Center |
| IAM-only access | Fewer prerequisites, works in any account |
Identity Center is not required. I chose IAM-only because it has fewer prerequisites and works in any AWS account, including personal and brand-new accounts. The Security Agent functionality is identical either way. This choice only affects how users authenticate to the console.
There is one warning to read carefully. When you select IAM-only, the console displays:
"IAM Identity Center can't be enabled after setup is complete. To manage users with IAM Identity Center, you must choose Single sign-on (SSO) with IAM Identity Center during initial setup."
In plain terms: if you choose IAM-only now and later want SSO, you have to delete your entire Security Agent setup and start over. All your Agent Spaces, findings, reviews, and pentests would need to be recreated. This is not a setting you can change later. The console says it plainly, but it is easy to miss. If your organization already uses Identity Center and several people will use Security Agent, choose SSO. If you are an individual or a small team doing security research, IAM-only is simpler.
The Web Application Role
The third section is Service Access. This creates an IAM role that connects the Security Agent web application to your account (AWS's docs call this the Application Role). The header text reads: "AWS Security Agent requires permissions to connect the AWS Security Agent user web app to your AWS account."
You can let the wizard create a default role (fastest, and what I used) or bring your own. If you bring your own, here is the permission policy the console generated for me, copied from its "View sample role policy" link. Treat this as what the console produced in my setup, not as a canonical documented policy. Use whatever the console shows you at the time.
{
    "Version": "2012-10-17",
    "Statement": [
        {
            "Sid": "CloudWatchLogsRead",
            "Effect": "Allow",
            "Action": "logs:GetLogEvents",
            "Resource": "arn:aws:logs:us-east-1:123456789012:log-group:*:log-stream:*"
        },
        {
            "Sid": "SecretsManagerCreate",
            "Effect": "Allow",
            "Action": "secretsmanager:CreateSecret",
            "Resource": "arn:aws:secretsmanager:us-east-1:123456789012:secret:*"
        },
        {
            "Effect": "Allow",
            "Action": "sts:SetContext",
            "Resource": "arn:aws:sts::123456789012:self"
        }
    ]
}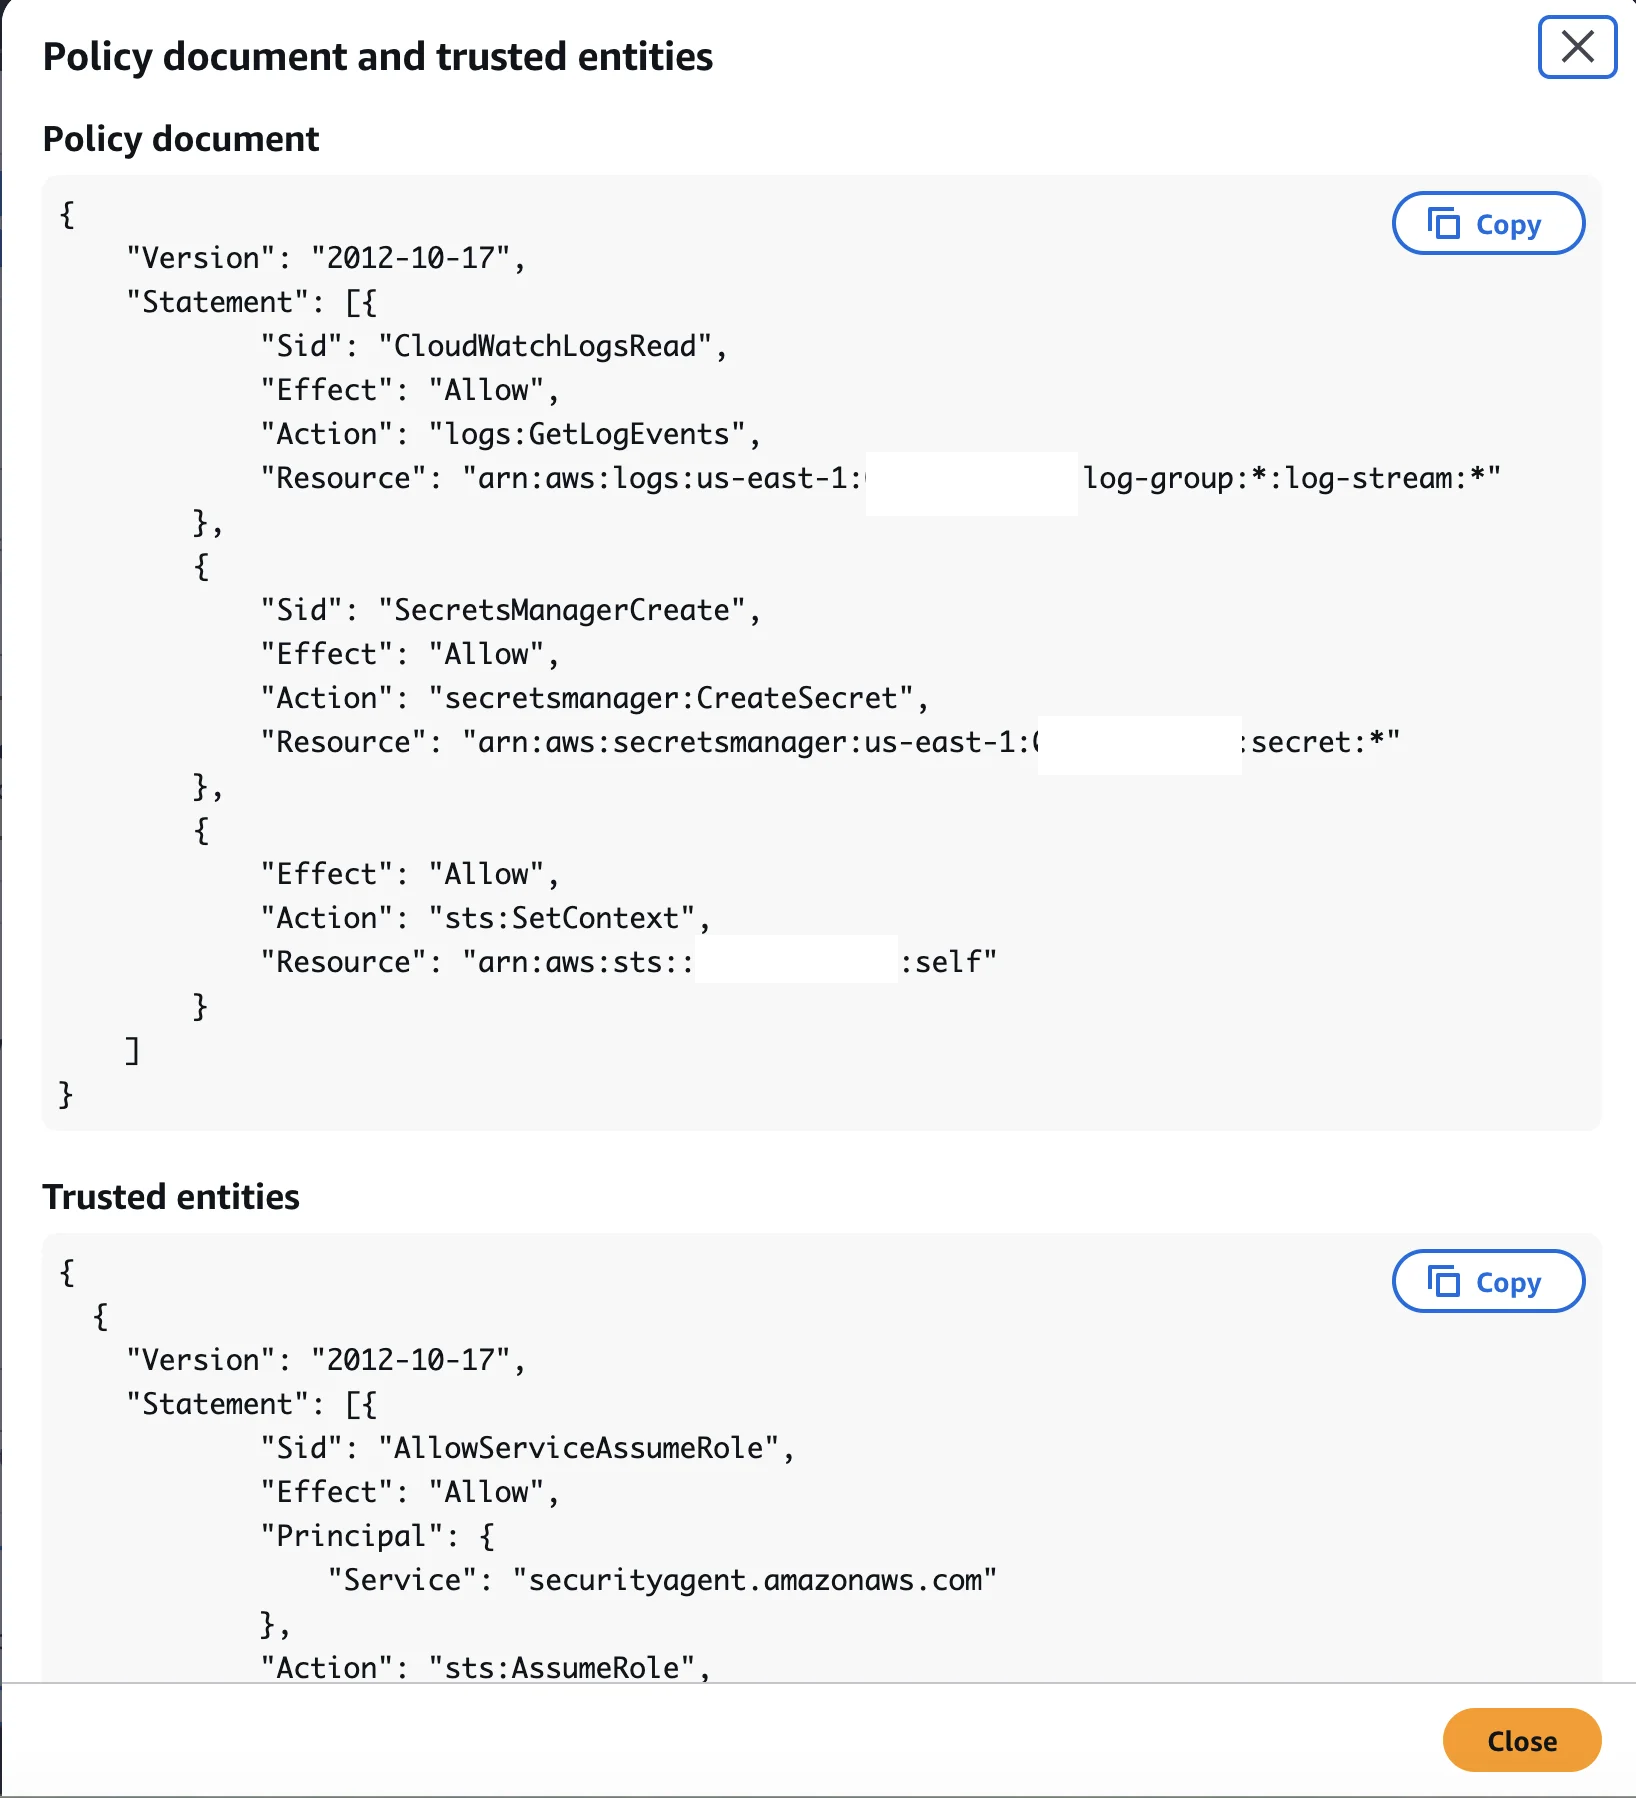
Three permissions total. CloudWatch log reading so the web app can display agent activity, Secrets Manager access so the app can store credentials, and STS SetContext for identity propagation. Replace 123456789012 with your own AWS account ID.
This is the web application role only. It is not the role the pentest agent uses during execution, which comes later in the wizard. Do not confuse the two.
The Trust Policy and Service Principal
The role's trust policy tells IAM which service is allowed to assume it. Here is the trust policy the console generated for me. As with the permission policy above, this is what the console produced in my setup, not a documented canonical policy; rely on the version your console displays:
{
    "Version": "2012-10-17",
    "Statement": [
        {
            "Sid": "AllowServiceAssumeRole",
            "Effect": "Allow",
            "Principal": {
                "Service": "securityagent.amazonaws.com"
            },
            "Action": "sts:AssumeRole",
            "Condition": {
                "StringEquals": {
                    "aws:SourceAccount": "123456789012"
                },
                "ArnLike": {
                    "aws:SourceArn": [
                        "arn:aws:securityagent:us-east-1:123456789012:application/*",
                        "arn:aws:securityagent:us-east-1:123456789012:agent-instance/*"
                    ]
                }
            }
        },
        {
            "Sid": "AllowServiceSetContext",
            "Effect": "Allow",
            "Principal": {
                "Service": "securityagent.amazonaws.com"
            },
            "Action": "sts:SetContext",
            "Condition": {
                "StringEquals": {
                    "aws:SourceAccount": "123456789012"
                },
                "ForAllValues:ArnEquals": {
                    "sts:RequestContextProviders": "arn:aws:iam::aws:contextProvider/IdentityCenter"
                },
                "ArnLike": {
                    "aws:SourceArn": [
                        "arn:aws:securityagent:us-east-1:123456789012:application/*",
                        "arn:aws:securityagent:us-east-1:123456789012:agent-instance/*"
                    ]
                }
            }
        }
    ]
}
The service principal is securityagent.amazonaws.com. A few details worth noting:
- Both statements use
aws:SourceAccountandArnLikeconditions to restrict which Security Agent resources can assume this role. - There are two statements: one for
sts:AssumeRole, one forsts:SetContext. - The
SourceArnuses thesecurityagent:ARN namespace withapplication/*andagent-instance/*resource types. - The SetContext statement references
arn:aws:iam::aws:contextProvider/IdentityCenter.
Replace 123456789012 with your own AWS account ID throughout.
Click "Set up" and you land on the Agent Space dashboard. The setup creates the Agent Space and an IAM role under service-role/ named after the Agent Space (for me, arn:aws:iam::123456789012:role/service-role/secagent-lab-role).
Two Different UIs
This trips people up early. AWS Security Agent has two separate interfaces.
The AWS Console is where you do setup and configuration. You manage Agent Spaces, configure IAM roles, set up domains, manage security requirements, and connect GitHub. The URL looks like https://console.aws.amazon.com/securityagent/.
The Web Application is where you do the actual work. You run pentests, create design reviews, view findings, and download reports. You reach it through the "Launch web application" button or the "Admin access" link in the Console. The URL follows this format:
https://app-{uuid}.securityagent.global.app.aws/...Different URLs, different navigation, different layout. When I say "go to the Console" versus "go to the Web Application" in this series, I mean these two distinct places.
After Setup: The Dashboard
The Agent Space dashboard shows three capability cards:
| Capability | Initial Status | Action |
|---|---|---|
| Design review | Ready | Start in web app |
| Code review | Needs setup | Enable code review |
| Penetration testing | Needs setup | Enable penetration test |
Design review is ready immediately after creating the Agent Space. It requires no domain verification and no running application, just upload a document. Penetration testing becomes ready once at least one domain is verified. Code review needs GitHub integration, which I cover in a later post.
Adding Target Domains
To run penetration tests, you need at least one verified domain. Click "Enable penetration test" on the dashboard and you enter the pentest setup wizard, which has three steps: configure domain (required), verify domains (required), and configure resources and access (optional).
Step 1 is straightforward. The header text reads: "Enter the domain(s) you want to verify and test. You can specify a base domain, or a sub-domain, such as 'example.com' or 'billing.example.com'. AWS suggests using sub-domains where you have permission to create DNS TXT records to verify."
Click "Add domain" and two fields appear: a Domain text input (max 255 characters) and a Verification method dropdown that defaults to DNS TXT Record. I entered vuln.lab.example.com, a subdomain of my Route 53-managed lab.example.com zone. In my testing the console let me add up to 5 domains per Agent Space, though I did not find a published quota confirming that number.
A note on scoping: AWS recommends using subdomains where you have permission to create DNS TXT records. This is good advice. If you verify vuln.lab.example.com, all its subdomains are automatically covered without additional verification.
Domain Verification: The Gotcha
Step 2 is where things got interesting. For publicly reachable targets, AWS proves ownership two ways: a DNS TXT record or an HTTP route that returns a validation string. The Route 53 "one-click" button you also see in the console is not a separate method; it automates the DNS TXT method, creating the TXT record for you when the domain lives in a Route 53 hosted zone in the same account. Private-VPC targets (where the domain resolves to a private CIDR) are verified separately, through a private hosted zone; that is a distinct path for private reachability, covered in Advanced Pentesting: VPC and Cross-Account, not a third public proof-of-ownership method. I worked with the DNS-based paths (one-click and manual TXT) and summarize the HTTP route from the docs; these console paths do not all behave the same way. See the official enable a test domain page for the canonical list.
The verification page shows your domain in a table with its status, verification method, a verification token, and a DNS record name. Two buttons sit at the top: "One-click verification" and "Verify". A blue info box explains the paths:
"For Route53 domain types: Select a Route53 domain and choose 'One-click verification' to automatically create and verify a DNS record. For Custom domain types: Copy the values from the table, update the DNS records in your DNS provider, then click 'Verify' to confirm."
The Easy Path: Route 53 One-Click (an automated form of DNS TXT, can fail)
This is the easiest path when it works: select a Route 53 domain in the same account, click "One-click verification", and the console creates and verifies the DNS TXT record for you. The catch is that it only works when the domain you enter exactly matches a Route 53 hosted zone name.
My domain vuln.lab.example.com is a subdomain within the lab.example.com hosted zone in the same AWS account. I expected one-click to work. It did not. The console classified the domain as "Custom domain" and one-click verification returned a "Failed" status.
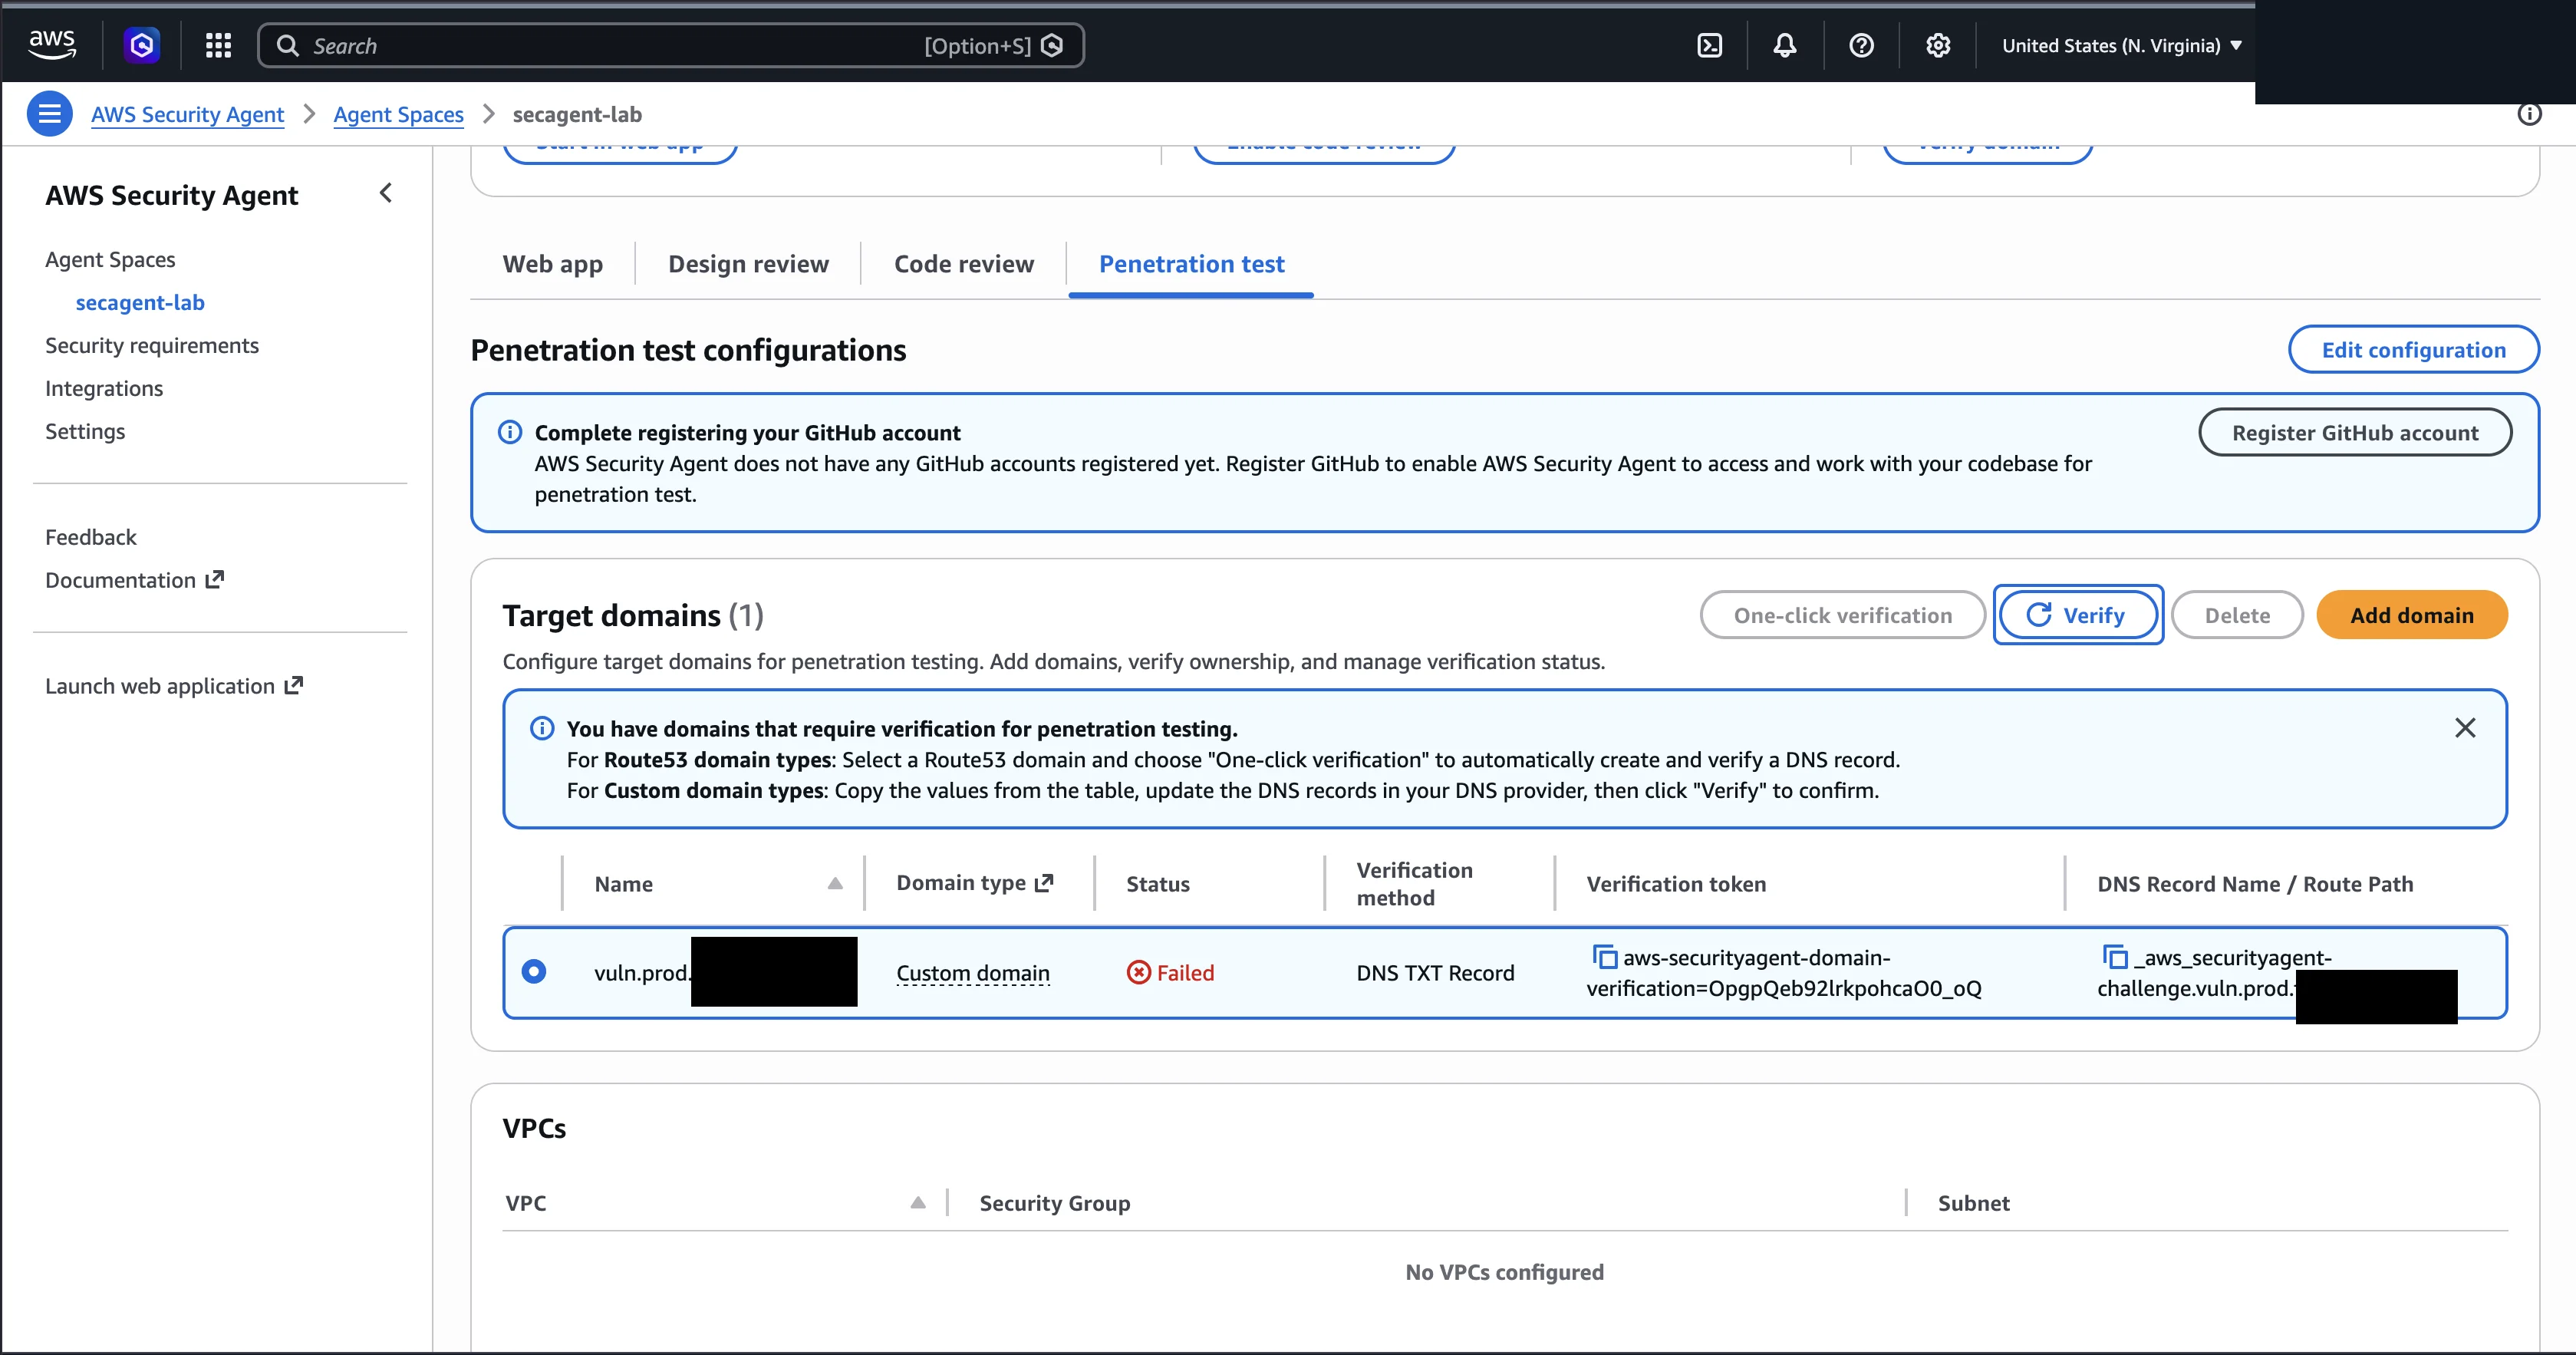
The reason: one-click only matches an exact hosted zone name. Enter lab.example.com and it works. Enter vuln.lab.example.com, a subdomain within that zone, and the console treats it as a custom domain, even though the parent zone is right there in Route 53 in the same account. This is not documented, and the wizard text actually recommends using subdomains, which makes the one-click failure especially confusing.
DNS TXT Record, Manual (reliable)
This is the method I recommend in almost every case. You create a DNS TXT record yourself using the two values from the console's verification table:
- DNS Record Name goes in the record's name. In my run it included the
_aws_securityagent-challenge.prefix, but the docs do not publish this prefix as a constant, so use whatever exact record name (prefix included) the console displays in your setup rather than assuming this string. - Verification token goes in the record's value. Use the exact token value the console displays, wrapped in escaped quotes. Do not add a prefix of your own; copy the value verbatim from the console.
If your DNS is in Route 53, here is an illustrative CLI command. Substitute the exact record name and token value the console shows you:
aws route53 change-resource-record-sets \
  --hosted-zone-id YOUR_HOSTED_ZONE_ID \
  --change-batch '{
    "Changes": [{
      "Action": "UPSERT",
      "ResourceRecordSet": {
        "Name": "_aws_securityagent-challenge.vuln.lab.example.com",
        "Type": "TXT",
        "TTL": 60,
        "ResourceRecords": [{"Value": "\"YOUR_TOKEN_FROM_CONSOLE\""}]
      }
    }]
  }'
Replace YOUR_HOSTED_ZONE_ID with your hosted zone ID and YOUR_TOKEN_FROM_CONSOLE with the exact token value the console displays. If you use a DNS provider other than Route 53 (Cloudflare and so on), create the same TXT record through their interface. After creating the record, go back to the console and click "Verify" (not "One-click verification"). The status changes to "Verified" and you are done.
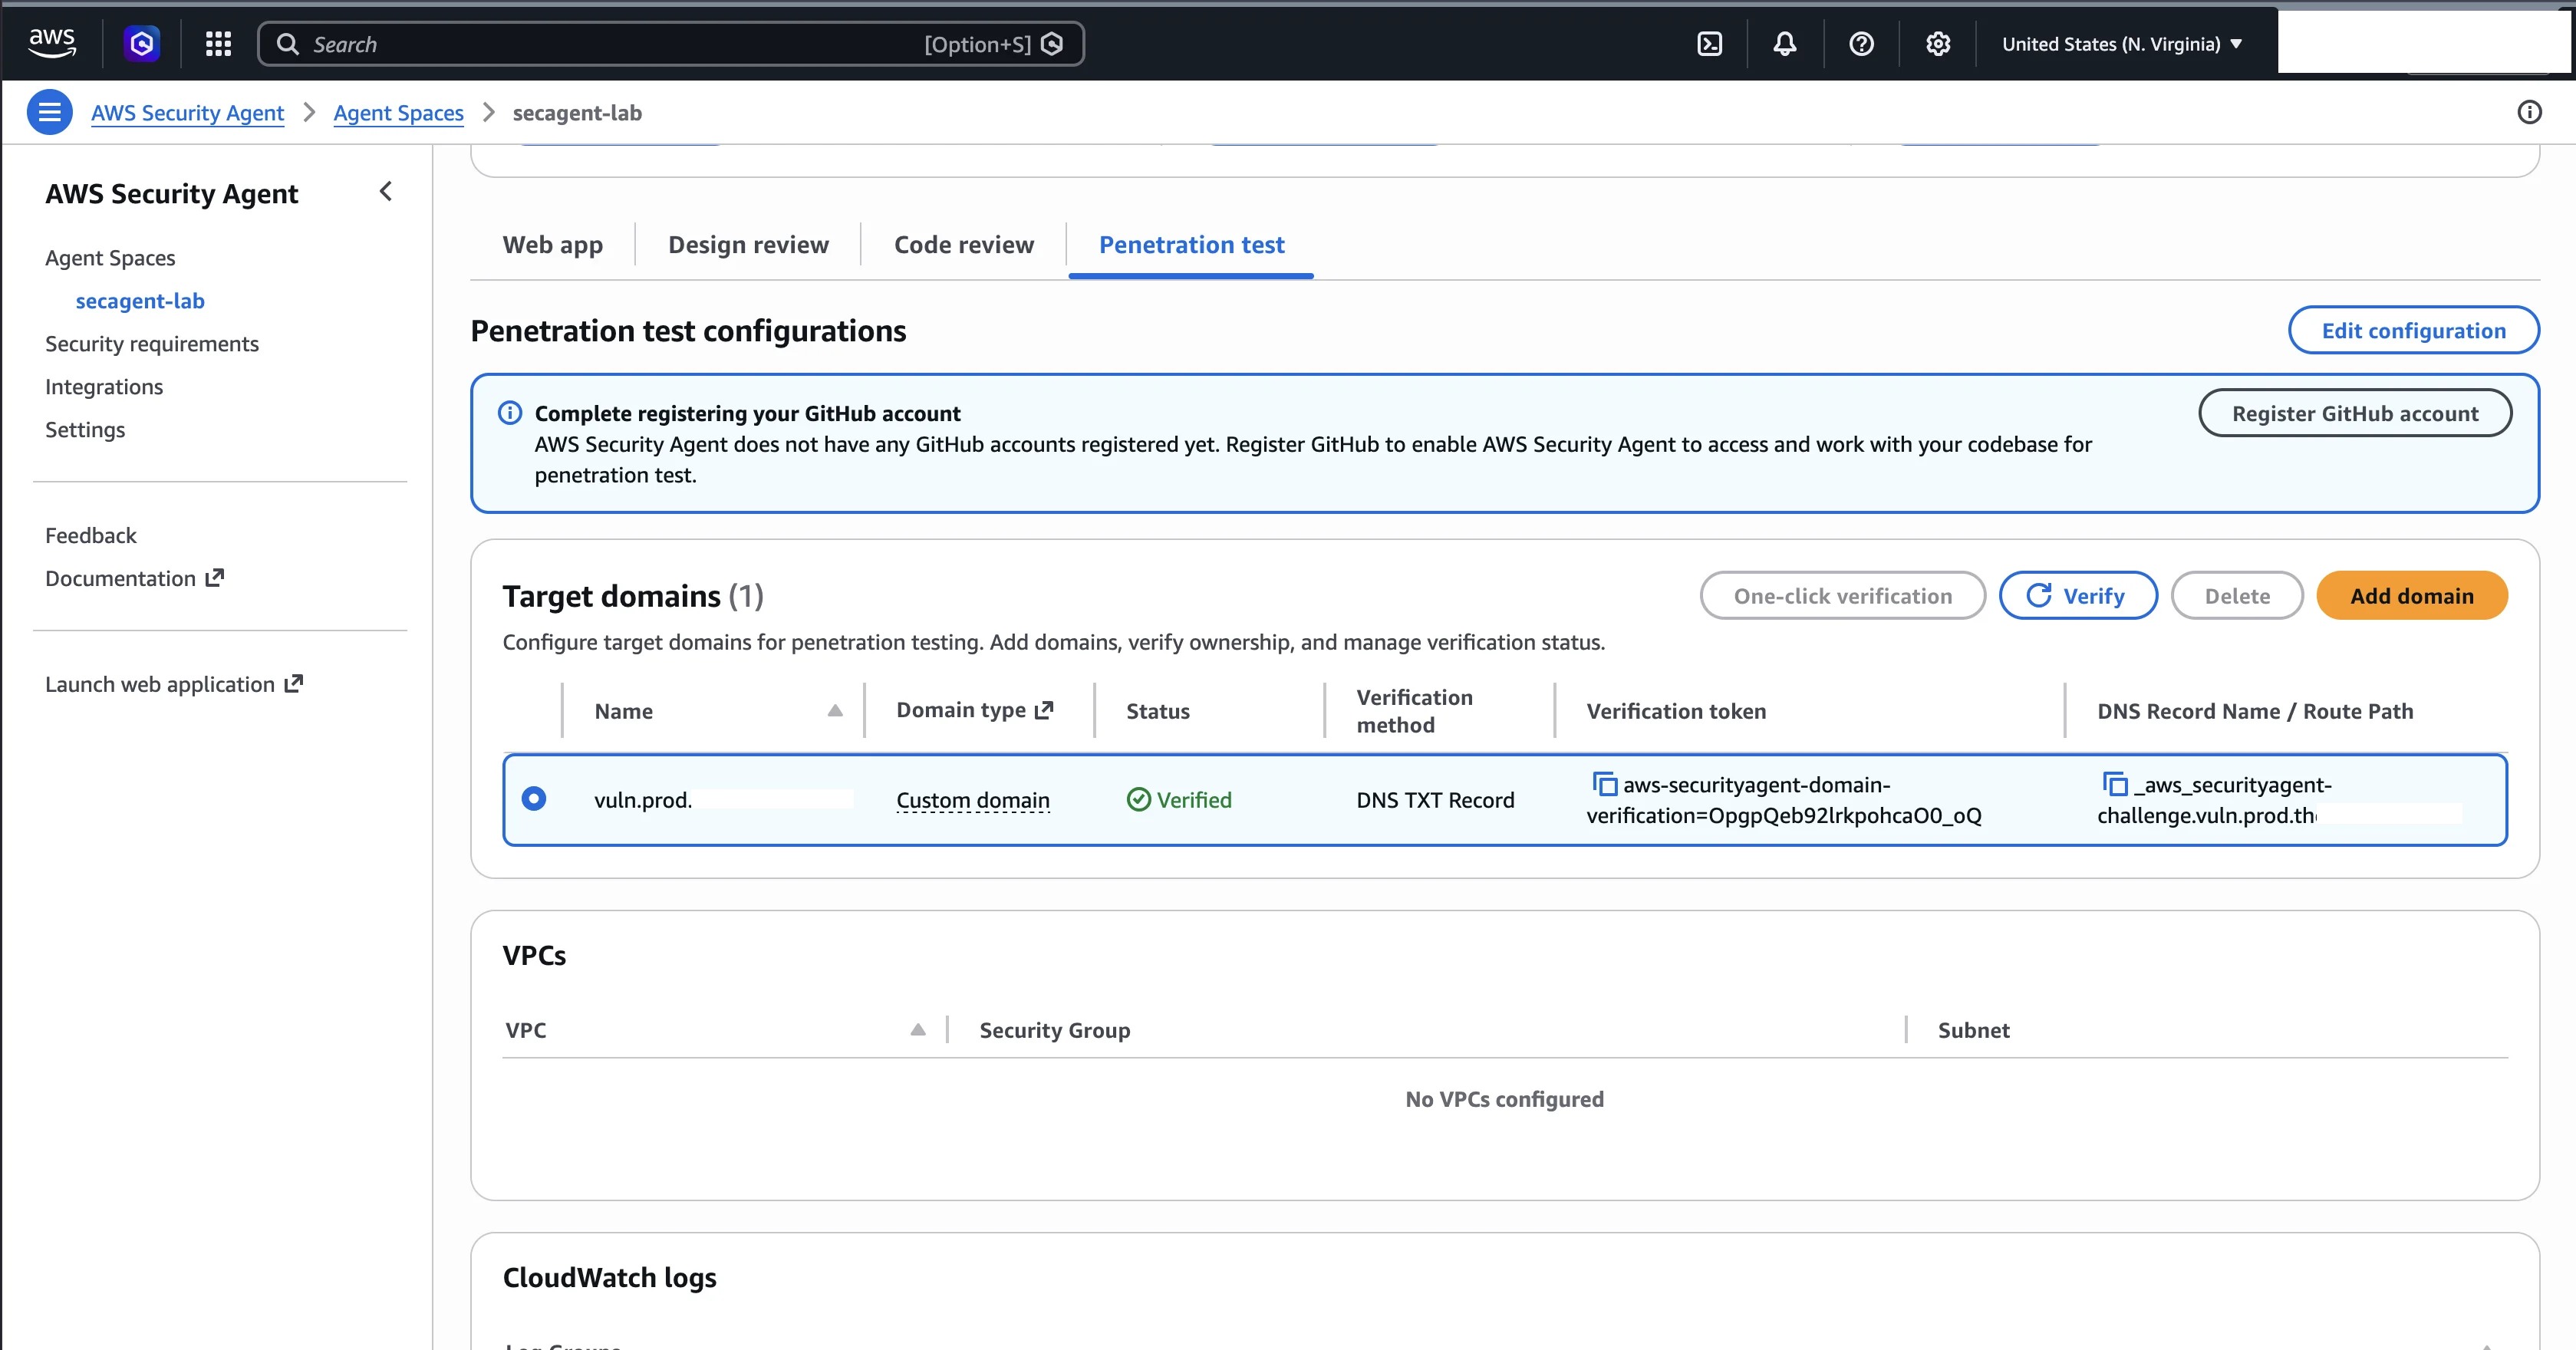
If the domain still shows "Pending" after clicking "Verify", the TXT record may not have propagated yet. Check with dig TXT _aws_securityagent-challenge.vuln.lab.example.com and wait a moment. With a low TTL (I used 60 seconds) propagation should be near-instant.
HTTP Route (.well-known path)
This method (AWS calls it "HTTP route") proves ownership by serving a verification token over HTTPS at a .well-known/ path on the domain instead of via DNS. This suits cases where you control the web server but not the DNS records, or where you want verification tied to the application itself. I did not use this method, so I am summarizing the AWS documentation rather than reporting from my own run.
Per the AWS docs, you create a file at .well-known/aws/securityagent-domain-verification.json on your web server and put the token the console provides inside it in this JSON shape:
{
  "tokens": [""]
}
You then return to the console, select the domain, and click "Verify"; AWS Security Agent sends an HTTPS GET request to that path and validates the token. If the domain is on the public internet, it needs a valid SSL certificate first. The console shows the exact token to use.
My Recommendation
| Method | When to use | Result in my test |
|---|---|---|
| Route 53 one-click (DNS TXT sub-path) | Domain exactly matches a Route 53 hosted zone name | Failed (subdomain) |
| DNS TXT record (manual) | Almost always, especially subdomains | Succeeded |
| HTTP route (.well-known) | You control the web server, not the DNS | Not needed |
| Private VPC | Private-VPC targets only; domain resolves to a private CIDR (see Advanced Pentesting: VPC and Cross-Account) | Not used here |
Use DNS TXT record verification by default. Only reach for one-click if your domain exactly matches a Route 53 hosted zone name. Remember that verifying a domain also covers all of its subdomains, so you do not need to verify each one separately.
The Pentest Service Role: Resources and Access
Step 3 of the wizard is optional. It offers six collapsible sections for VPCs, CloudWatch logs, Secrets Manager secrets, Lambda functions, S3 buckets, and a service access role for pentest execution. For a first setup against a public-facing application, you can skip everything except the service access role. The agent creates default resources (like a CloudWatch log group) during pentest execution if you do not provide them.
The service access role is the role the AWS Security Agent service assumes to access your AWS resources during a pentest. In AWS's IAM documentation this is the Penetration Test Service Role. It is a separate role from the web application role created during initial setup. The web app role has three permissions (log reading, secret storage, STS context); the pentest service role powers the agent's execution environment during pentests. Different roles, different purposes, do not confuse them.
One naming caution: the docs also define an Actor Role, which is a different thing again. The Actor Role is used to authenticate to AWS-hosted target applications (API Gateway APIs, Lambda function URLs, ALB with Cognito), and it is configured during Agent Space creation, not here. So AWS uses three role names (Application Role, Penetration Test Service Role, Actor Role); the role you configure in this step is the Penetration Test Service Role.
The section reads: "Authorize AWS Security Agent to access AWS resources for penetration testing. A service role will be automatically created if you don't select an existing role." You either create a default role or select an existing one. If you create a default role, you provide a name (maximum 64 characters, alphanumeric plus +=,.@-, no spaces, unique across all roles in the account). It is created under service-role/. Mine was arn:aws:iam::123456789012:role/service-role/secagent-pentest-role.
I configured only the service access role and skipped VPCs, logs, secrets, Lambda functions, and S3 buckets. Click "Save" and you return to the dashboard.
What You Just Built
Here is the full picture of what the setup created:
| Resource | Purpose |
|---|---|
Agent Space (secagent-lab) | Workspace for one application |
Web app role (secagent-lab-role) | Connects the web application to your AWS account (3 permissions) |
Pentest service role (secagent-pentest-role) | Powers the agent's execution environment during pentests (AWS docs: Penetration Test Service Role) |
Verified domain (vuln.lab.example.com) | Target authorized for penetration testing |
| Web application access | Separate UI for running tests and viewing results |
After domain verification, the dashboard shows penetration testing as "Ready":
| Capability | Status | Action |
|---|---|---|
| Design review | Ready | Start in web app |
| Code review | Needs setup | Enable code review |
| Penetration testing | Ready | Start in web app |
You may also see an info banner prompting you to register a GitHub account. That is optional. The agent can pentest without GitHub, but connecting it gives the agent source code context for deeper analysis and enables the "Remediate code" feature on findings. I cover GitHub integration in a later post.
Data Handling
Two things worth knowing before you start testing.
All customer data (design documents, submitted code, and pentest findings) is encrypted at rest using AWS KMS (AES-256 by default, with an optional customer-managed key). Separately, penetration-test logs are stored in CloudWatch in your own account. Your data is not used for model training.
The agent's default User-Agent header is securityagent. Every HTTP request the agent makes to your application during a penetration test carries this User-Agent. You can override it with a custom header in the pentest configuration, but the default makes it easy to identify agent traffic in your access logs. I confirmed this in my own nginx access logs during a run.
What Comes Next
Your environment is ready. You have an Agent Space with an access method, a verified domain, and both IAM roles: the web application role and the pentest service role.
With setup complete, the fastest way to see the agent in action is a design review. No code needed, no running application, just upload a document. That is what I do next in Design Reviews.
Go Deeper: The State of AWS Security 2026
This article is just the start. Get the full picture with our free whitepaper - 8 chapters covering IAM, S3, VPC, monitoring, agentic AI security, compliance, and a prioritized action plan with 50+ CLI commands.
Toc Consulting: AWS Security & Cloud Architecture
Want expert help with AWS Security?
Our team helps engineering teams secure and architect AWS the right way: assessment in week one, a prioritized action plan in week two.
More Articles
KloudSec Is Live. This Is My Fight for Every Company That Isn't a Giant.
KloudSec, an agentless AWS security platform, is live. Why I built it, and why small and growing companies deserve the same protection as the largest ones.
The Verdict, Four Months Later
Part 16 of 16 in the AWS Security Agent: From Zero to Hero series. Closing the series: the numbers this whole project is built on, the honest verdict distilled to its essentials, what AWS has shipped since my hands-on testing, and an evidence-based look at how AI pentesting stacks up against traditional consultancy today.
The Agent's AWS Footprint
Part 15 of 16 in the AWS Security Agent: From Zero to Hero series. What AWS Security Agent leaves behind in your own account. CloudTrail events, Secrets Manager entries, and VPC Flow Logs, with the commands to audit and observe every run yourself.