Mastering AWS SAM for Python Lambda: The Ultimate Hands-On Guide
Tarek Cheikh
Founder & AWS Cloud Architect
Level: Complete Beginner to Confident Builder
What You'll Build: A real serverless API that you can show off to friends
Why This Tutorial Exists
Most AWS tutorials throw code at you without explaining what's happening or why you need it. By the end of this guide, you'll not only have a working serverless API, but you'll understand every piece of it.
You'll learn by building something real: an API that tells visitors their location based on their IP address. It's simple enough to understand, but complex enough to teach you the important concepts.
What You'll Actually Learn
- What "serverless" really means (and why you should care)
- How to build an API that costs almost nothing to run
- How to test your code locally before deploying
- How to deploy to AWS with confidence
- How to debug problems when things go wrong
Most importantly, you'll understand WHY we do each step, not just HOW.
Let's Start With the Basics: What is Serverless?
Imagine you're running a food truck. Traditional web hosting is like renting a restaurant:
- You pay rent every month, whether you have customers or not
- You handle all the maintenance, cleaning, utilities
- If you suddenly get a line of 100 people, you're in trouble
Serverless is like having a magical food truck that:
- Only charges you when someone orders food
- Automatically handles all the maintenance
- Can instantly serve 1 customer or 1,000 customers
- You just focus on making great food (writing code)
AWS Lambda is Amazon's serverless service. Your code sits dormant until someone triggers it (like visiting your website), then it springs to life, does its job, and goes back to sleep.
AWS SAM (Serverless Application Model) is like having a smart assistant who:
- Sets up everything you need automatically
- Lets you test your "food truck" in your kitchen before taking it to the street
- Handles all the paperwork and permits
- Makes deployment as simple as pressing a button

When Should You Use Serverless?
Perfect for:
- APIs that don't get constant traffic — You pay nothing when no one is using it
- Processing files or data — Someone uploads a photo, your code resizes it
- Webhooks — Other services need to notify your app about something
- Scheduled tasks — Daily reports, cleanup jobs, sending emails
- Prototypes — Test ideas without infrastructure costs
Not great for:
- Long-running processes — Lambda has a 15-minute maximum runtime
- Applications with constant traffic — Traditional servers might be cheaper
- Real-time applications — Like chat apps that need persistent connections
What You Need Before We Start
Don't worry — I'll explain what each thing is and why you need it.
Python 3.9 or Higher
python --versionWhat is this? Python is the programming language we'll use. AWS Lambda supports several Python versions, and 3.9+ gives us access to modern features that make our code cleaner.
Why not just any version? AWS Lambda runs on specific versions. Using an old version means your code might behave differently when deployed.
Docker Desktop
docker --versionWhat is this? Docker is like a virtual computer inside your computer. SAM uses it to create an exact copy of the AWS environment on your laptop.
Why do I need this? Testing locally with Docker means no surprises when you deploy. If it works on your laptop, it'll work on AWS.
How to get it: Download Docker Desktop from docker.com and install it.
AWS Command Line Interface (CLI)
pip install awscli
aws --version
What is this? A tool that lets your computer talk to AWS services.
Why do I need this? SAM uses it to deploy your code to AWS. Think of it as the bridge between your computer and Amazon's servers.
An AWS Account
What is this? Your account with Amazon Web Services. It's free to create.
Why do I need this? This is where your serverless function will live and run.
What about costs? AWS has a generous free tier. For learning, you'll likely pay nothing or just a few cents.
Configure Your AWS Credentials
aws configureThis asks for four things:
- AWS Access Key ID — Like a username for AWS
- AWS Secret Access Key — Like a password for AWS
- Default region — Where in the world to create your resources (choose one close to you)
- Default output format — Type
json
Where do I get the keys?
- Log into AWS Console
- Click your name (top right) → Security Credentials
- Create Access Key
- Save both keys somewhere safe
SAM CLI
# Option 1: Using pip (works on all systems)
pip install aws-sam-cli

# Option 2: On macOS with Homebrew
brew tap aws/tap
brew install aws-sam-cli

# Verify it worked
sam --version
What is this? The main tool we'll use. It's like having a smart assistant that knows how to build and deploy serverless applications.
Quick check that everything works:
python --version && docker --version && aws --version && sam --versionIf all four commands show version numbers, you're ready!
Step 1: Create Your First Serverless Project
Let's create your first serverless application. We'll start with AWS's built-in template, then customize it to do something interesting.
sam init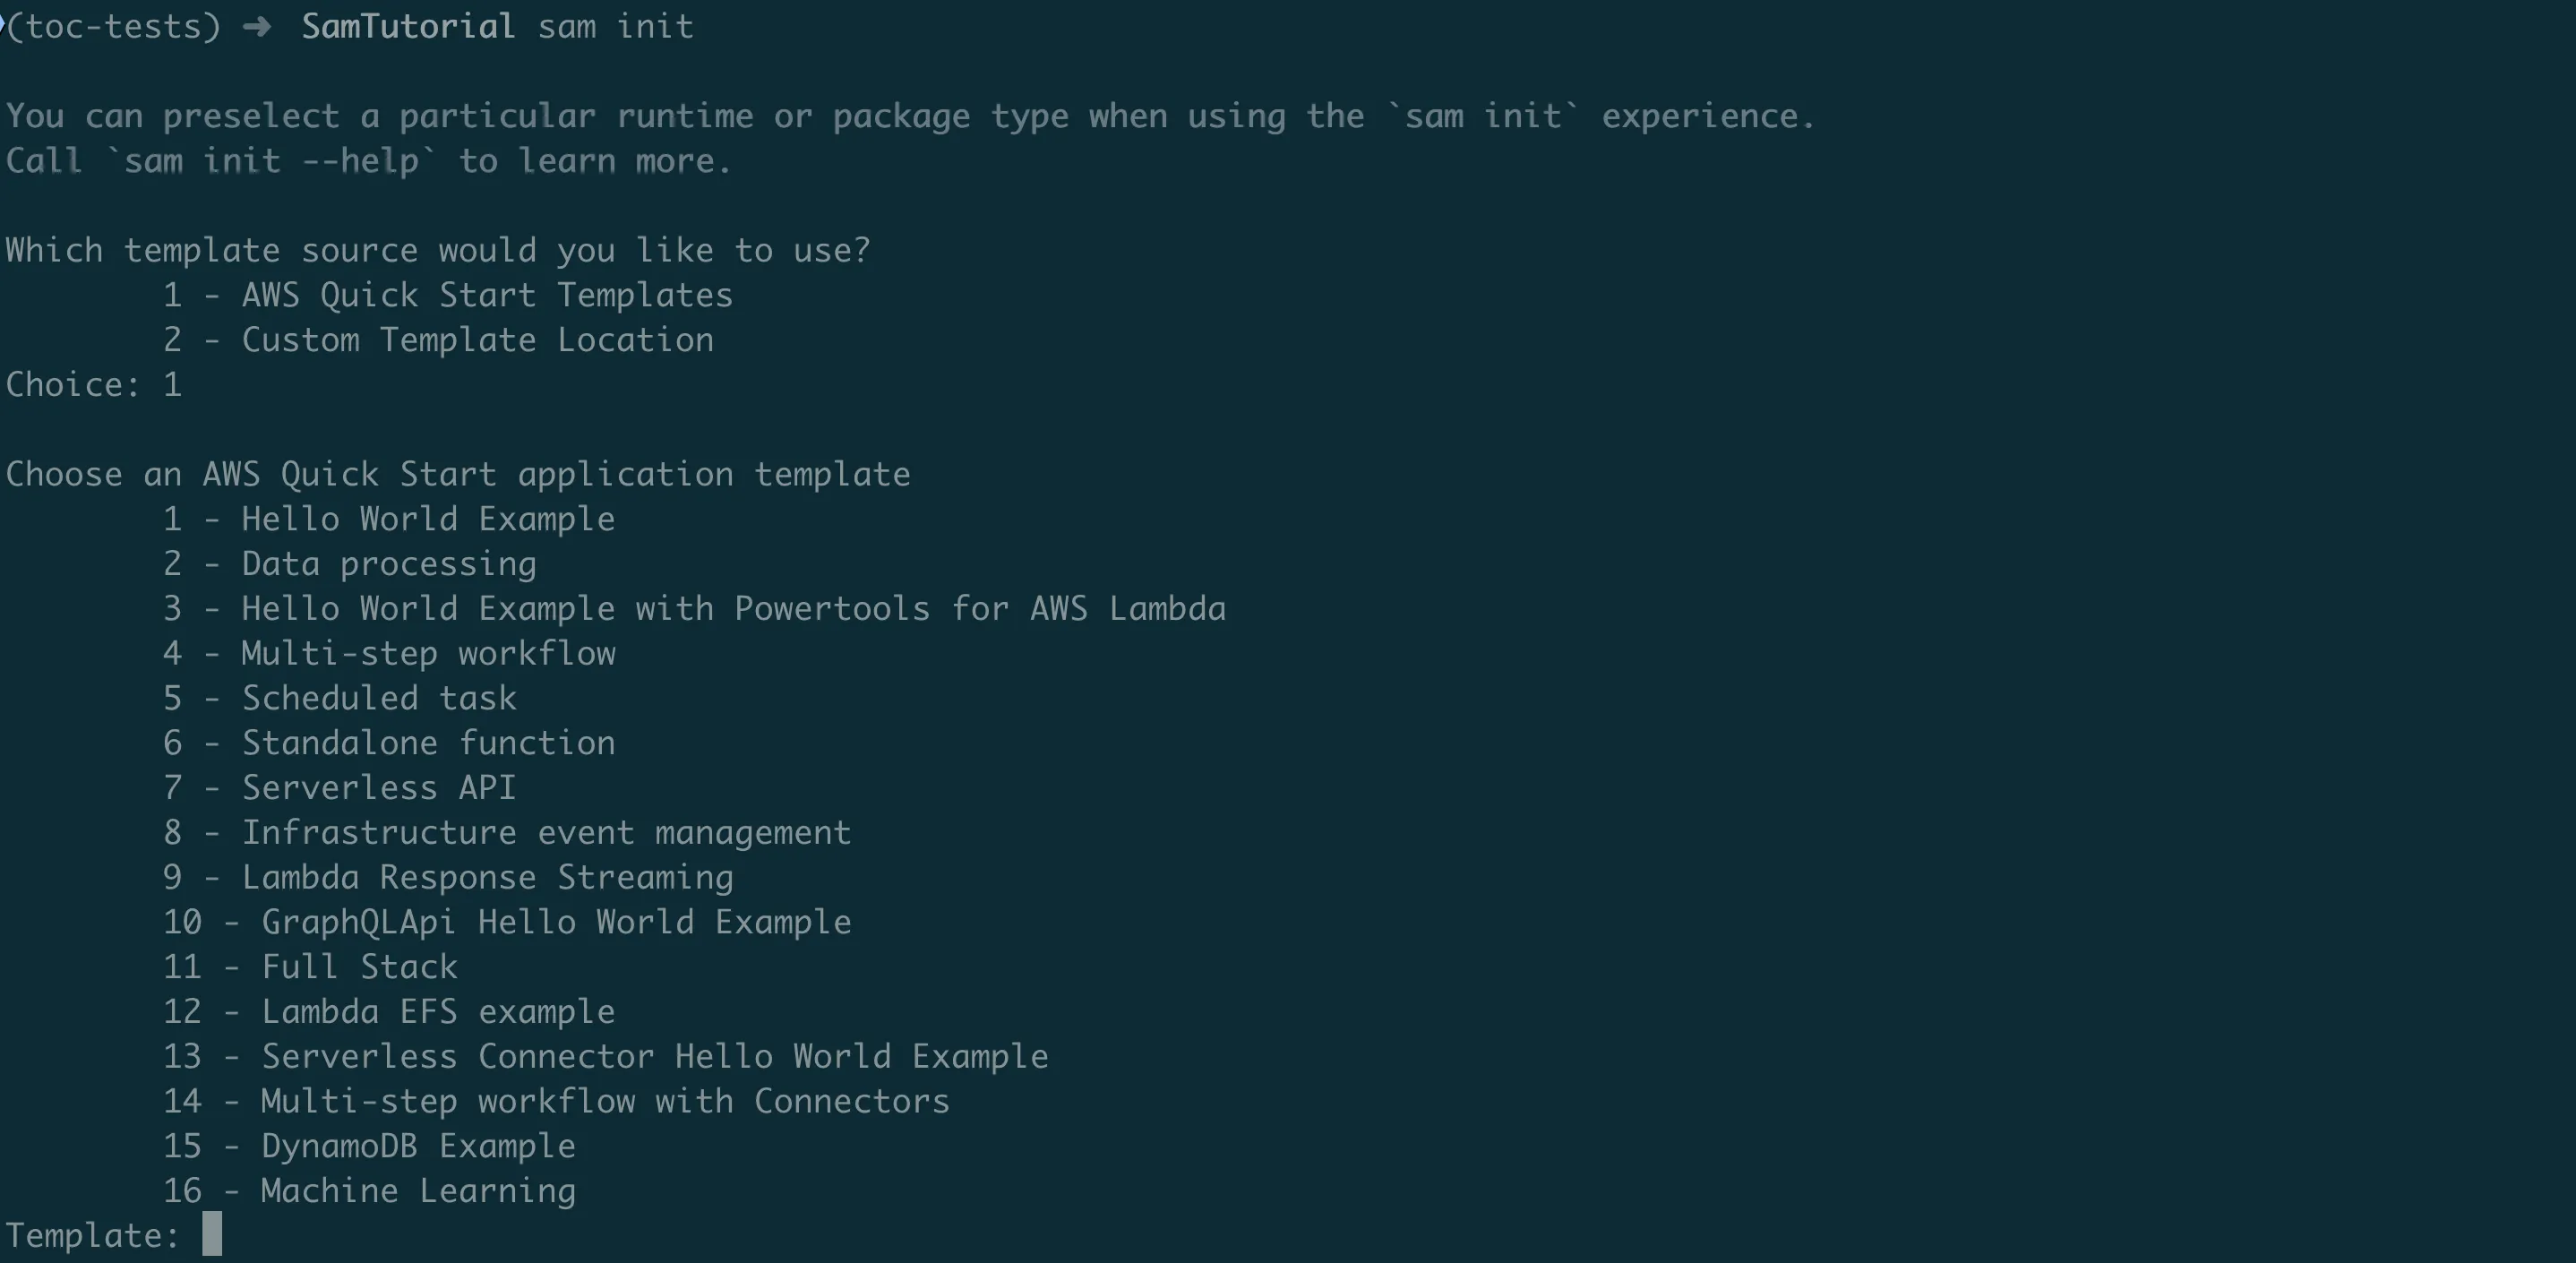
This starts an interactive setup. Let me walk you through each choice and explain what it means:
First, SAM shows you a welcome message explaining that it collects telemetry (usage data) to improve the tool. This is optional and helps AWS make SAM better.
Template source options:
Which template source would you like to use?
    1 - AWS Quick Start Templates
    2 - Custom Template Location
Choice: 1
Choose 1. AWS Quick Start Templates are pre-built project structures for common use cases. They're battle-tested and follow best practices.
Package type:
Use the most popular runtime and package type? (python3.13 and zip) [y/N]: yType y. This chooses Python 3.13 (the latest) and "zip" packaging (simpler than container images for beginners).
Template selection:
Choose an AWS Quick Start application template
    1 - Hello World Example
    2 - Data processing
    3 - Hello World Example with Powertools for AWS Lambda
    (... more options)
Template: 1
Choose 1 — Hello World Example. This gives us a simple API that we can understand and modify.
What are the other templates for?
- Data processing: For handling file uploads, image resizing, etc.
- Powertools: Adds advanced logging and monitoring (overkill for learning)
- Multi-step workflow: For complex business processes with multiple steps
- Scheduled task: For code that runs on a schedule (like cron jobs)
Project name:
Project name [sam-app]: my-first-serverless-apiGive it a descriptive name. I'll use my-first-serverless-api.
Additional options:
Would you like to enable X-Ray tracing on the function(s) in your application? [y/N]: N
Would you like to enable monitoring using CloudWatch Application Insights? [y/N]: N
Would you like to set Structured Logging in JSON format on your function? [y/N]: N
Type N to all three. These are advanced features that add complexity. We'll keep things simple for learning.
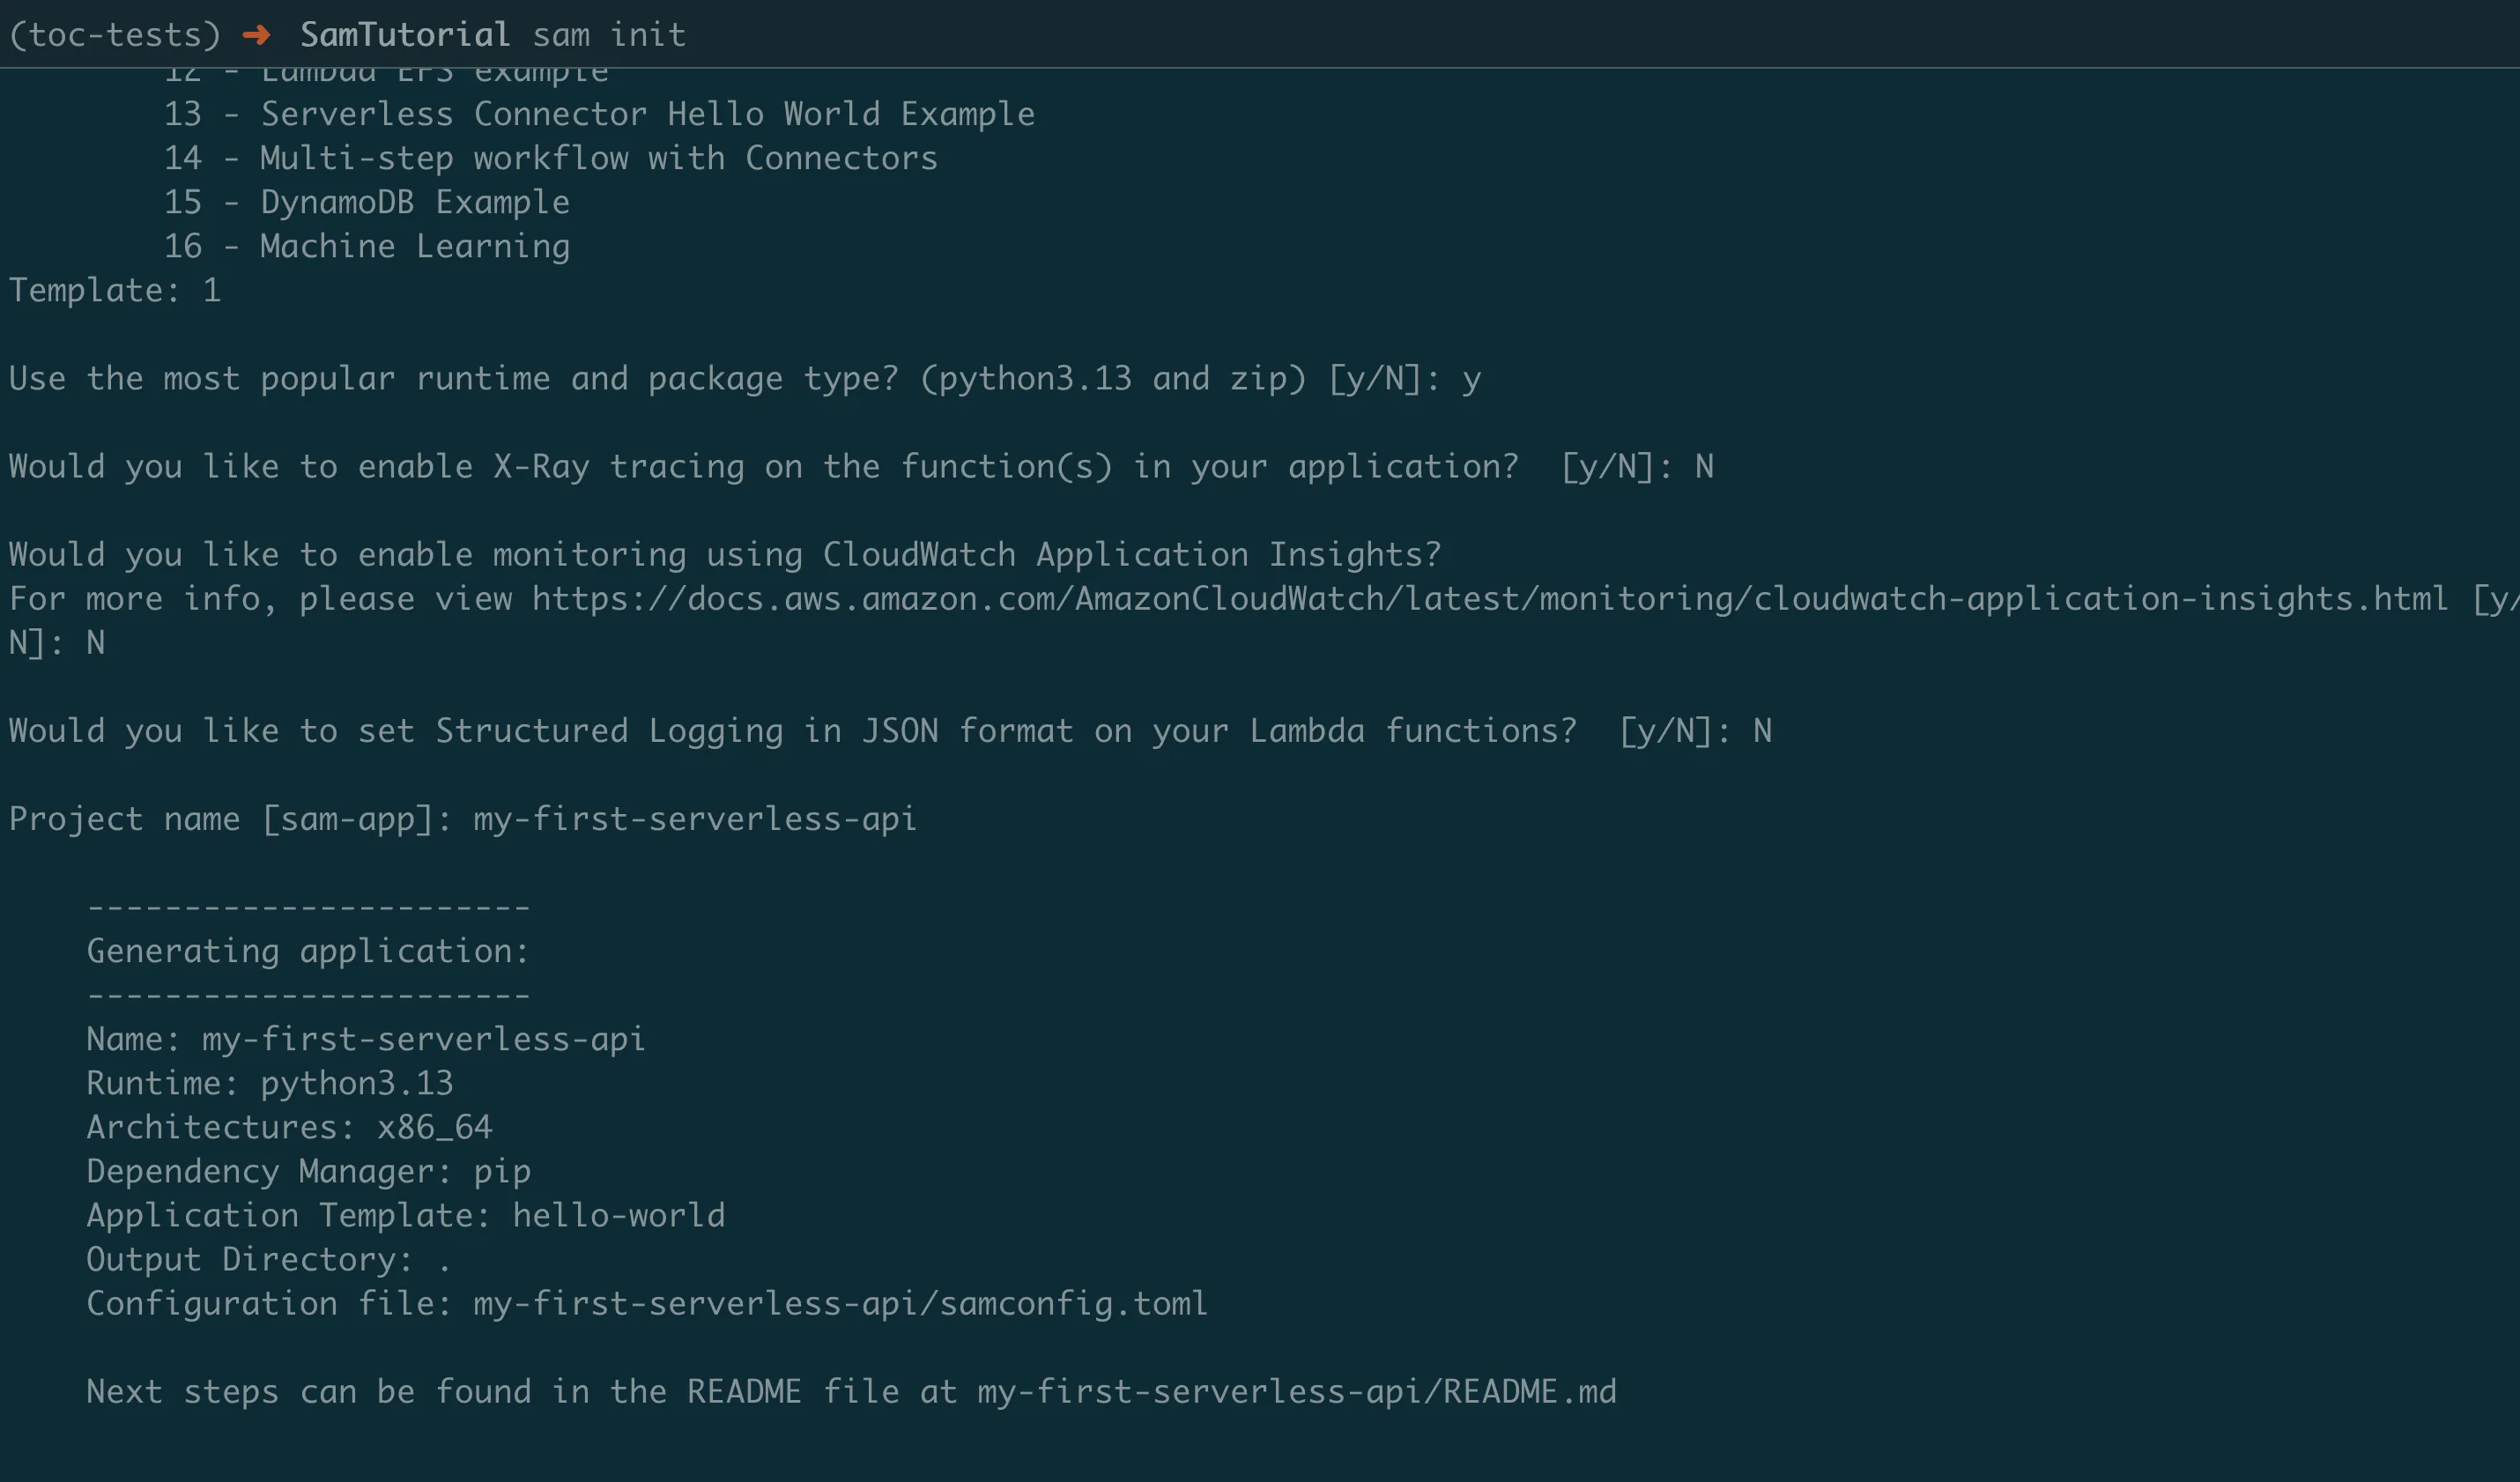
What just happened? SAM downloaded a template from GitHub and created a new folder with all the files you need for a serverless application.
Navigate to your new project:
cd my-first-serverless-api
ls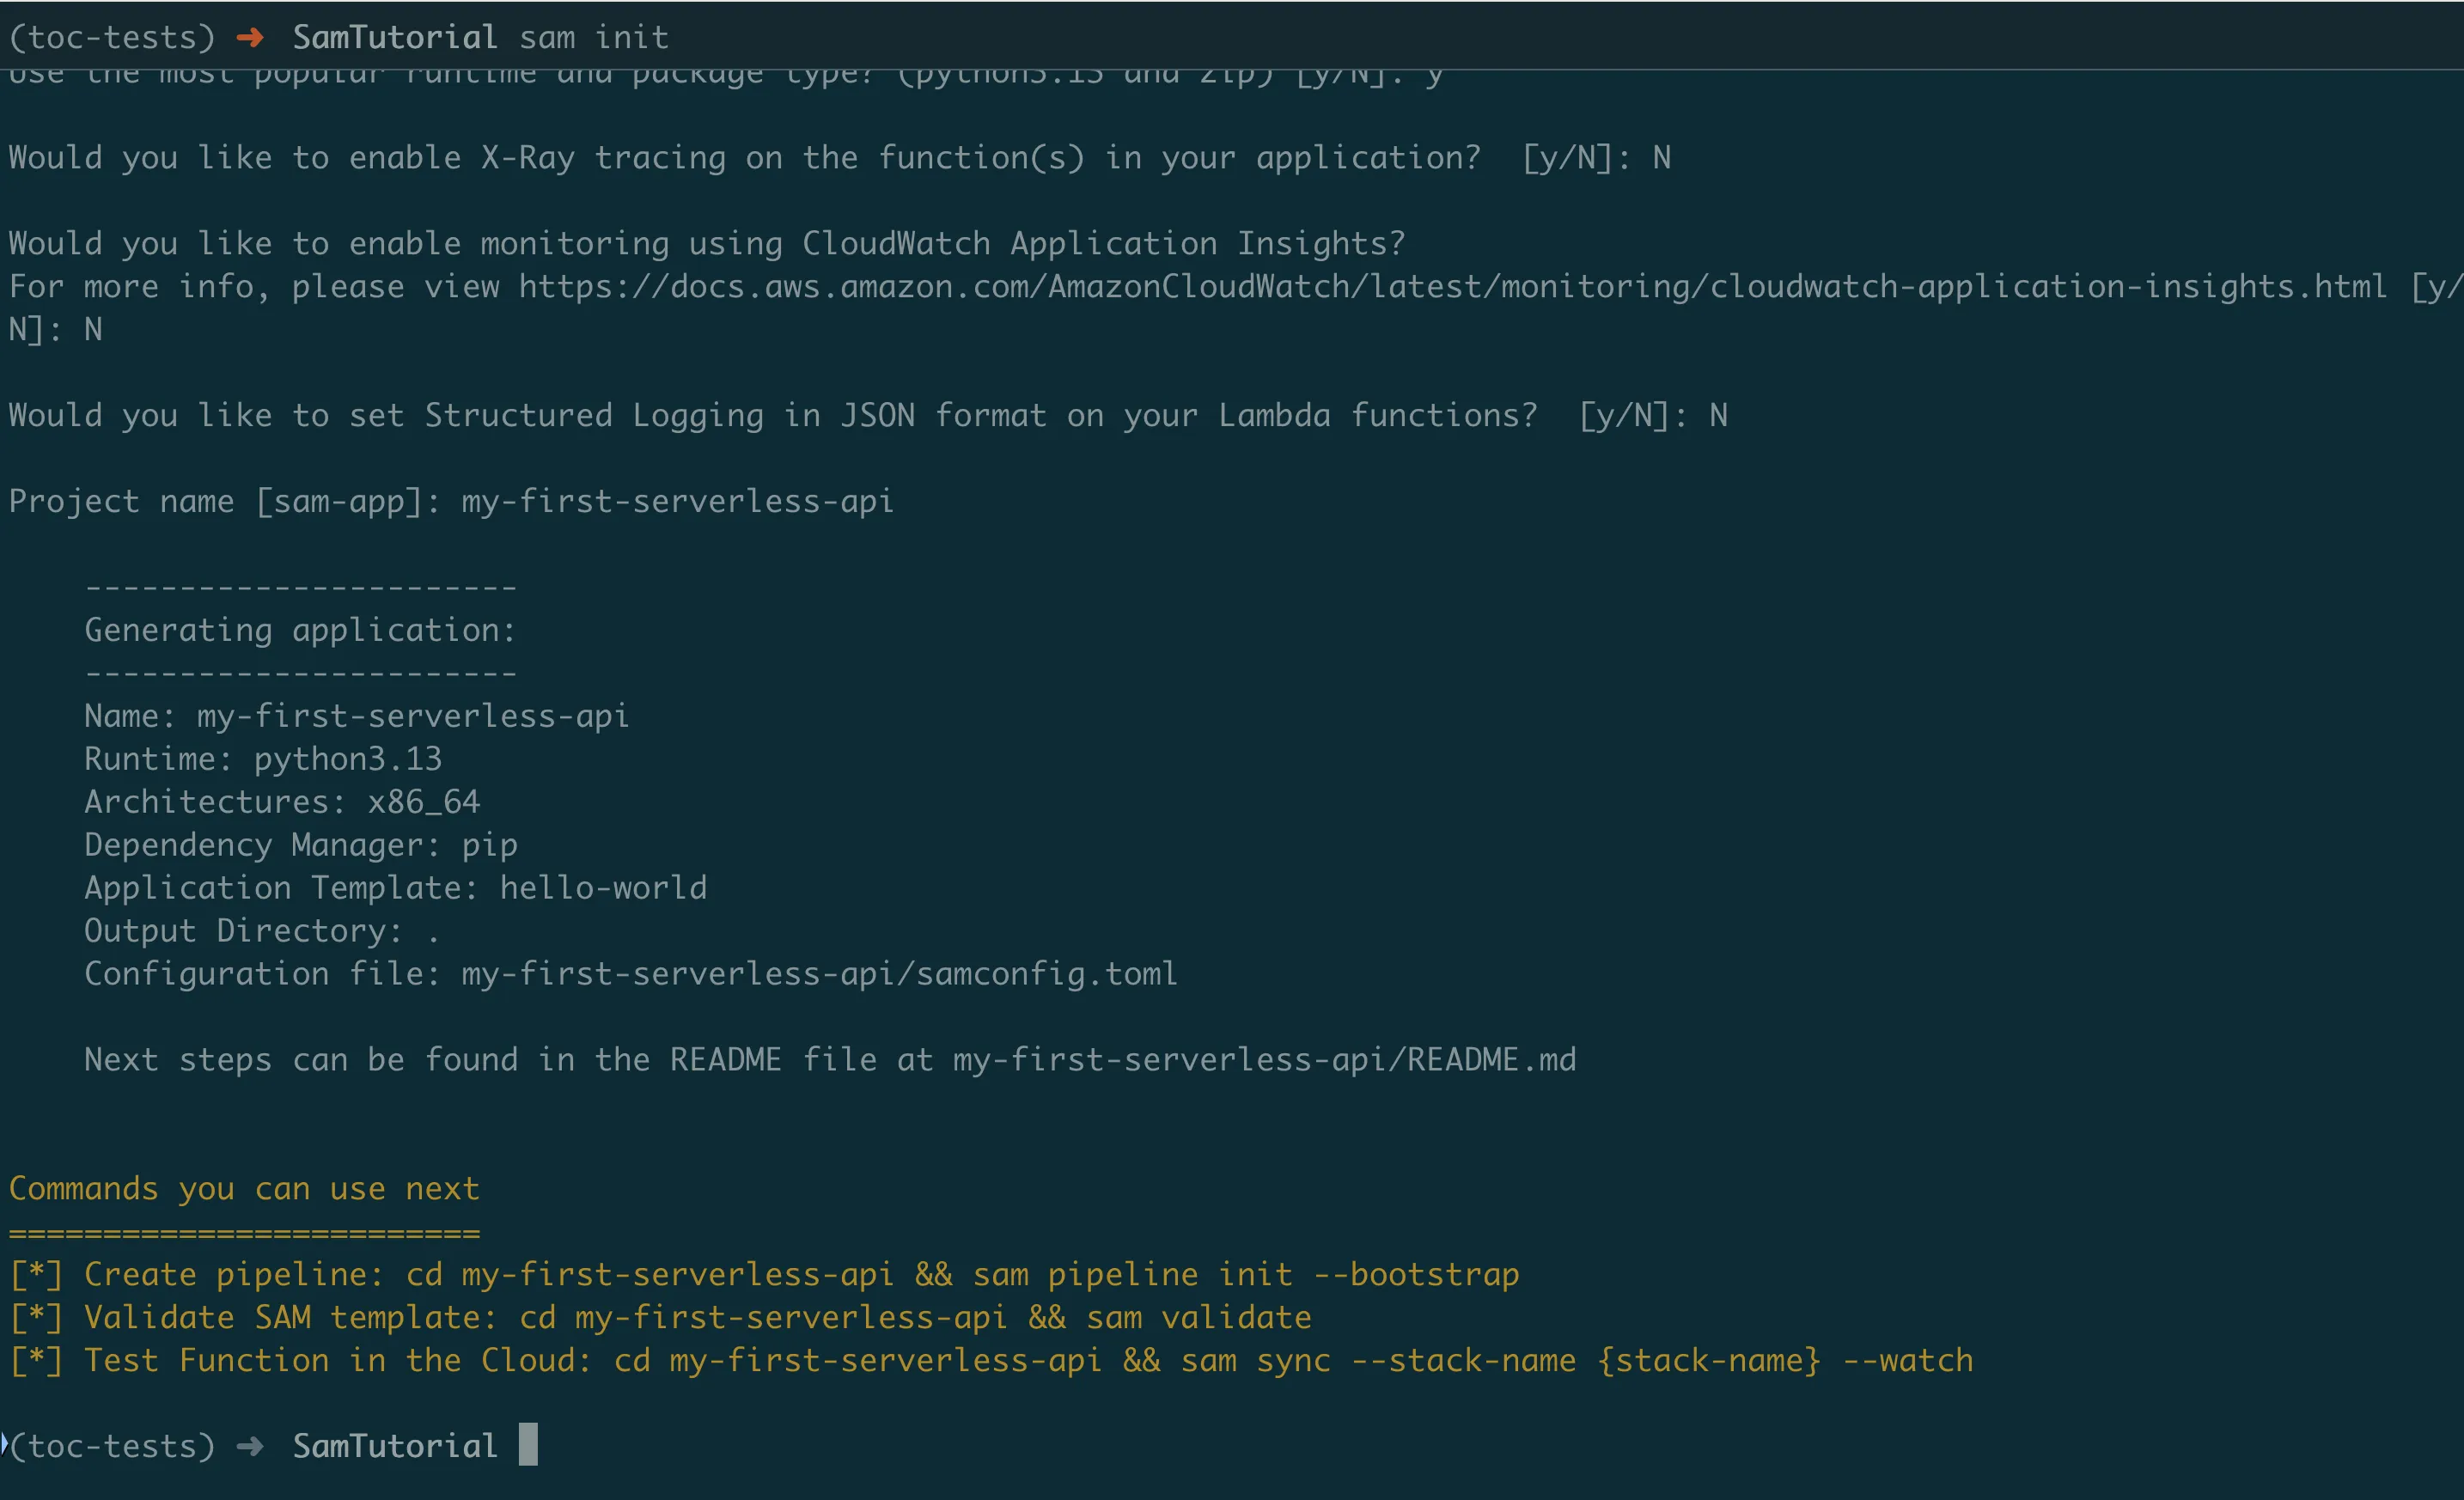
Let's see what SAM created for us:
my-first-serverless-api/
├── hello_world/          # Your Python code goes here
├── events/               # Test data for local testing
├── tests/                # Automated tests (we'll add some later)
├── template.yaml         # The blueprint for your infrastructure
├── .gitignore            # Tells Git which files to ignore
└── README.md             # Documentation
Understanding Your Project (The Important Stuff)
Let's look at the key files and understand what each one does.
The Blueprint: template.yaml
This file is like an architect's blueprint. It tells AWS exactly what to build for you.
AWSTemplateFormatVersion: '2010-09-09'
Transform: AWS::Serverless-2016-10-31

Globals:
  Function:
    Timeout: 3
    MemorySize: 128

Resources:
  HelloWorldFunction:
    Type: AWS::Serverless::Function
    Properties:
      CodeUri: hello_world/
      Handler: app.lambda_handler
      Runtime: python3.13
      Architectures:
        - x86_64
      Events:
        HelloWorld:
          Type: Api
          Properties:
            Path: /hello
            Method: get

Outputs:
  HelloWorldApi:
    Description: "API Gateway endpoint URL for Prod stage for Hello World function"
    Value: !Sub "https://${ServerlessRestApi}.execute-api.${AWS::Region}.amazonaws.com/Prod/hello/"
Let me explain this in plain English:
The header section:
AWSTemplateFormatVersion: '2010-09-09'
Transform: AWS::Serverless-2016-10-31
This tells AWS: "This is a CloudFormation template (AWS's infrastructure language), but use SAM to make it simpler."
Global settings:
Globals:
  Function:
    Timeout: 3
    MemorySize: 128
This says: "For all functions in this project, kill them if they run longer than 3 seconds, and give them 128MB of memory." These are starting points — you can change them later.
The actual function:
HelloWorldFunction:
  Type: AWS::Serverless::Function
This creates an AWS Lambda function named "HelloWorldFunction". SAM automatically creates the IAM role (permissions) and CloudWatch logs (for debugging) that go with it.
Where to find your code:
CodeUri: hello_world/
Handler: app.lambda_handler
This tells AWS: "The code is in the hello_world/ folder, and when someone triggers this function, call the lambda_handler function inside the app.py file."
What triggers your function:
Events:
  HelloWorld:
    Type: Api
    Properties:
      Path: /hello
      Method: get
This creates an API Gateway that listens for GET requests to /hello. When someone visits yourapi.com/hello, it triggers your Lambda function.
What you get back after deployment:
Outputs:
  HelloWorldApi:
    Value: !Sub "https://${ServerlessRestApi}.execute-api.${AWS::Region}.amazonaws.com/Prod/hello/"
After deployment, SAM will tell you the URL where your API is available. The !Sub part means "substitute variables" — AWS fills in the actual API ID and region.
Your Python Code: hello_world/app.py
This is where your actual logic lives:
import json

def lambda_handler(event, context):
    """Sample pure Lambda function"""

    return {
        "statusCode": 200,
        "body": json.dumps({
            "message": "hello world",
        }),
    }
Let's understand this step by step:
The function signature:
def lambda_handler(event, context):This function name (lambda_handler) must match what you specified in template.yaml. AWS will call this function when your API receives a request.
The event parameter contains information about the request:
- What URL was requested
- HTTP method (GET, POST, etc.)
- Headers sent by the browser
- Query parameters (?name=john)
- Request body (for POST requests)
The context parameter contains information about the Lambda environment:
- How much time is left before timeout
- Request ID (useful for debugging)
- Function name and version
What your function returns:
return {
    "statusCode": 200,
    "body": json.dumps({
        "message": "hello world",
    }),
}
This is the HTTP response format that API Gateway expects:
statusCode: HTTP status (200 = success, 404 = not found, 500 = error)body: The actual response data (must be a string, that's why we usejson.dumps())
Why json.dumps()? Your Python dictionary needs to be converted to a JSON string because HTTP responses are always text.
Test Data: events/event.json
This file contains sample data for testing your function locally:
{
  "body": "{\"message\": \"hello world\"}",
  "resource": "/{proxy+}",
  "path": "/path/to/resource",
  "httpMethod": "POST",
  "queryStringParameters": {
    "foo": "bar"
  },
  "headers": {
    "Accept": "text/html,application/xhtml+xml,application/xml;q=0.9,image/webp,*/*;q=0.8",
    "User-Agent": "Custom User Agent String",
    "X-Forwarded-For": "127.0.0.1, 127.0.0.2"
  }
}
What is this? This is what the event parameter looks like when API Gateway calls your function. It's a lot of information about the HTTP request.
Why is this useful? You can use this file to test your function locally without deploying it to AWS first.
Making It More Interesting
The default "hello world" is boring. Let's modify our function to do something useful: tell visitors their public IP address and location.
Why this example?
- It's simple enough to understand
- It demonstrates making external API calls (a common need)
- It shows error handling
- It's actually useful!
First, let's add a dependency. Edit hello_world/requirements.txt:
requestsWhat is this file? It tells AWS which Python packages to install alongside your code. requests is a popular library for making HTTP calls.
Now, let's update our function. Replace the contents of hello_world/app.py:
import json
import requests
import logging

# Set up logging so we can debug issues
logger = logging.getLogger()
logger.setLevel(logging.INFO)

def lambda_handler(event, context):
    """
    A function that tells visitors their public IP address.

    This demonstrates:
    - Making external API calls
    - Error handling
    - Logging for debugging
    - Proper API response format
    """

    logger.info("Someone called our API!")

    try:
        # Get the visitor's public IP address
        logger.info("Fetching public IP address...")
        ip_response = requests.get("http://checkip.amazonaws.com/", timeout=3)

        # Check if the request was successful
        ip_response.raise_for_status()

        # Extract the IP address (and remove any whitespace)
        public_ip = ip_response.text.strip()

        logger.info(f"Got IP address: {public_ip}")

        # Create our response
        response_data = {
            "message": "Hello! Here's your information:",
            "your_ip": public_ip,
            "request_id": context.aws_request_id,
            "served_by": "AWS Lambda"
        }

        # Return success response
        return {
            "statusCode": 200,
            "headers": {
                "Content-Type": "application/json",
                # Allow browsers to call our API from any website
                "Access-Control-Allow-Origin": "*"
            },
            "body": json.dumps(response_data, indent=2)
        }

    except requests.exceptions.Timeout:
        logger.error("Request timed out while fetching IP")
        return create_error_response(504, "The external service took too long to respond", context.aws_request_id)

    except requests.exceptions.RequestException as e:
        logger.error(f"Request failed: {e}")
        return create_error_response(502, "Could not fetch your IP address", context.aws_request_id)

    except Exception as e:
        logger.error(f"Unexpected error: {e}")
        return create_error_response(500, "Something went wrong on our end", context.aws_request_id)

def create_error_response(status_code, message, request_id=None):
    """
    Create a standardized error response.

    Why separate function? It keeps our code DRY (Don't Repeat Yourself)
    and ensures all errors follow the same format.
    """
    return {
        "statusCode": status_code,
        "headers": {
            "Content-Type": "application/json",
            "Access-Control-Allow-Origin": "*"
        },
        "body": json.dumps({
            "error": message,
            "request_id": request_id or "unknown"
        })
    }
Let me explain what we added and why:
Logging:
logger = logging.getLogger()
logger.setLevel(logging.INFO)
Why? When your function runs in AWS, you can't see what's happening. Logging lets you write messages that appear in CloudWatch logs, helping you debug issues.
External API call:
ip_response = requests.get("http://checkip.amazonaws.com/", timeout=3)Why timeout=3? Without a timeout, your function could wait forever for a response. Since Lambda has a 3-second timeout by default, we need to be faster than that.
Error handling:
try:
    # Main logic here
except requests.exceptions.Timeout:
    # Handle timeout specifically
except requests.exceptions.RequestException as e:
    # Handle other network errors
except Exception as e:
    # Handle any other unexpected errors
Why so many exception types? Different errors need different responses. A timeout (504) is different from a general network error (502) or a bug in our code (500).
Response headers:
"headers": {
    "Content-Type": "application/json",
    "Access-Control-Allow-Origin": "*"
}
What do these do?
Content-Type: Tells the browser we're sending JSON dataAccess-Control-Allow-Origin: Allows browsers to call our API from any website (CORS)
Building and Testing Locally
Before deploying to AWS, let's test our function on your computer. This saves time and money.
Step 1: Build Your Application
sam validate
sam build
What is SAM doing?
- Reading your template.yaml to understand your function
- Installing Python dependencies from requirements.txt
- Packaging your code in a way that Lambda understands
- Creating a build folder with everything ready for deployment
You should see:
Build Succeeded

Built Artifacts  : .aws-sam/build
Built Template   : .aws-sam/build/template.yaml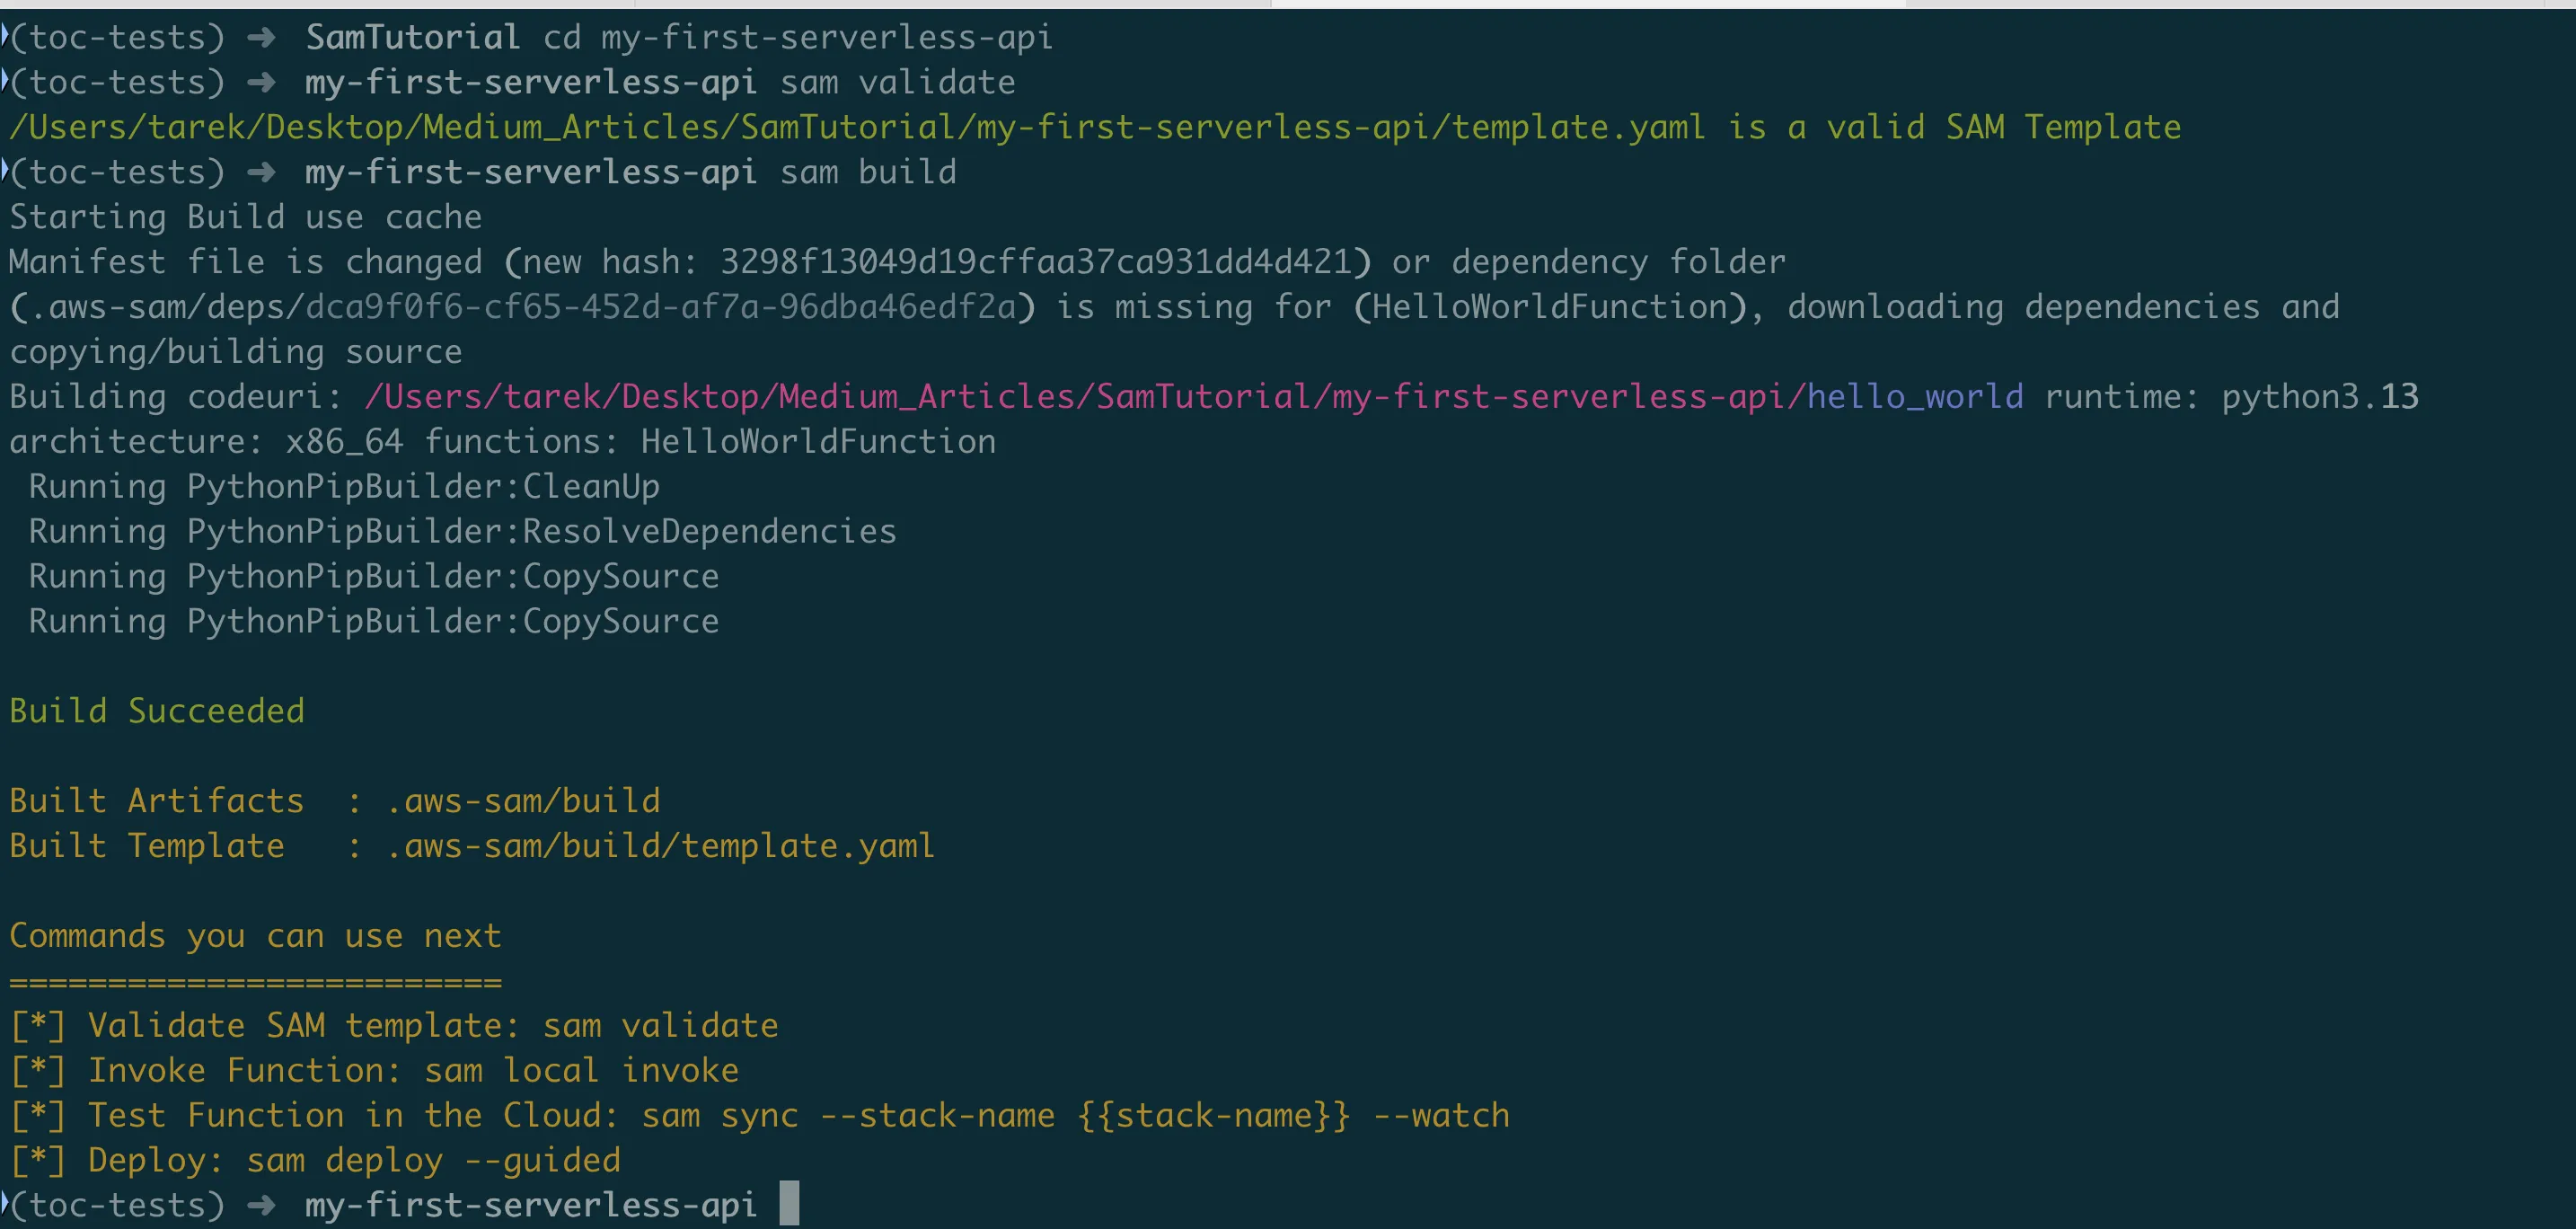
What if it fails? Common issues:
- Docker not running: Start Docker Desktop
- Python syntax error: Check your code for typos
- Missing requirements.txt: Make sure the file exists and lists
requests
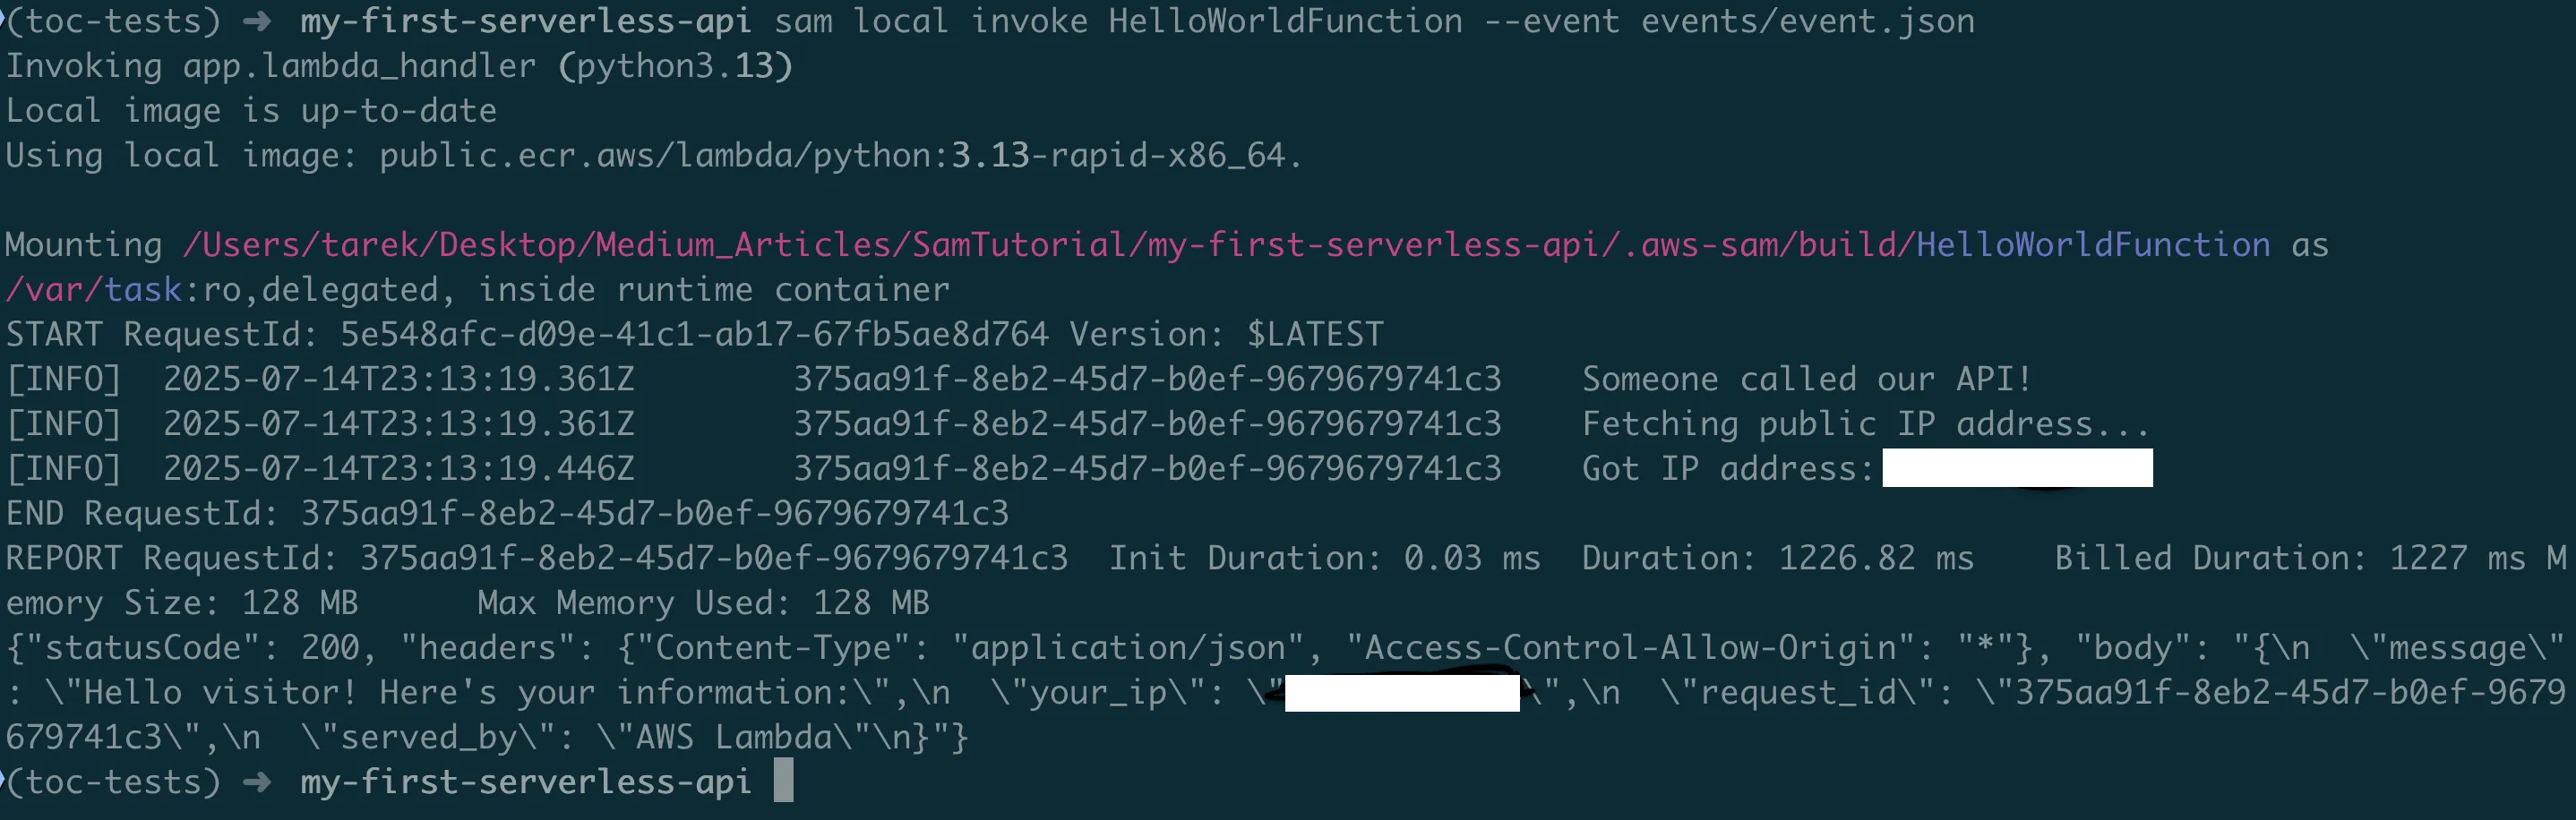
Step 2: Test Your Function Directly
sam local invoke HelloWorldFunction --event events/event.jsonWhat happens here?
- SAM starts a Docker container with the same environment as AWS Lambda
- Loads your code into the container
- Sends the test event to your function
- Shows you the response and performance metrics
You should see something like:
{
  "statusCode": 200,
  "headers": {
    "Content-Type": "application/json",
    "Access-Control-Allow-Origin": "*"
  },
  "body": "{\n  \"message\": \"Hello! Here's your information:\",\n  \"your_ip\": \"203.0.113.1\",\n  \"request_id\": \"12345-67890\",\n  \"served_by\": \"AWS Lambda\"\n}"
}
Step 3: Start a Local Web Server
This is even better — you get a real API you can test with your browser:
sam local start-apiWhat you'll see:
Mounting HelloWorldFunction at http://127.0.0.1:3000/hello [GET]
You can now browse to the above endpoints to invoke your functions.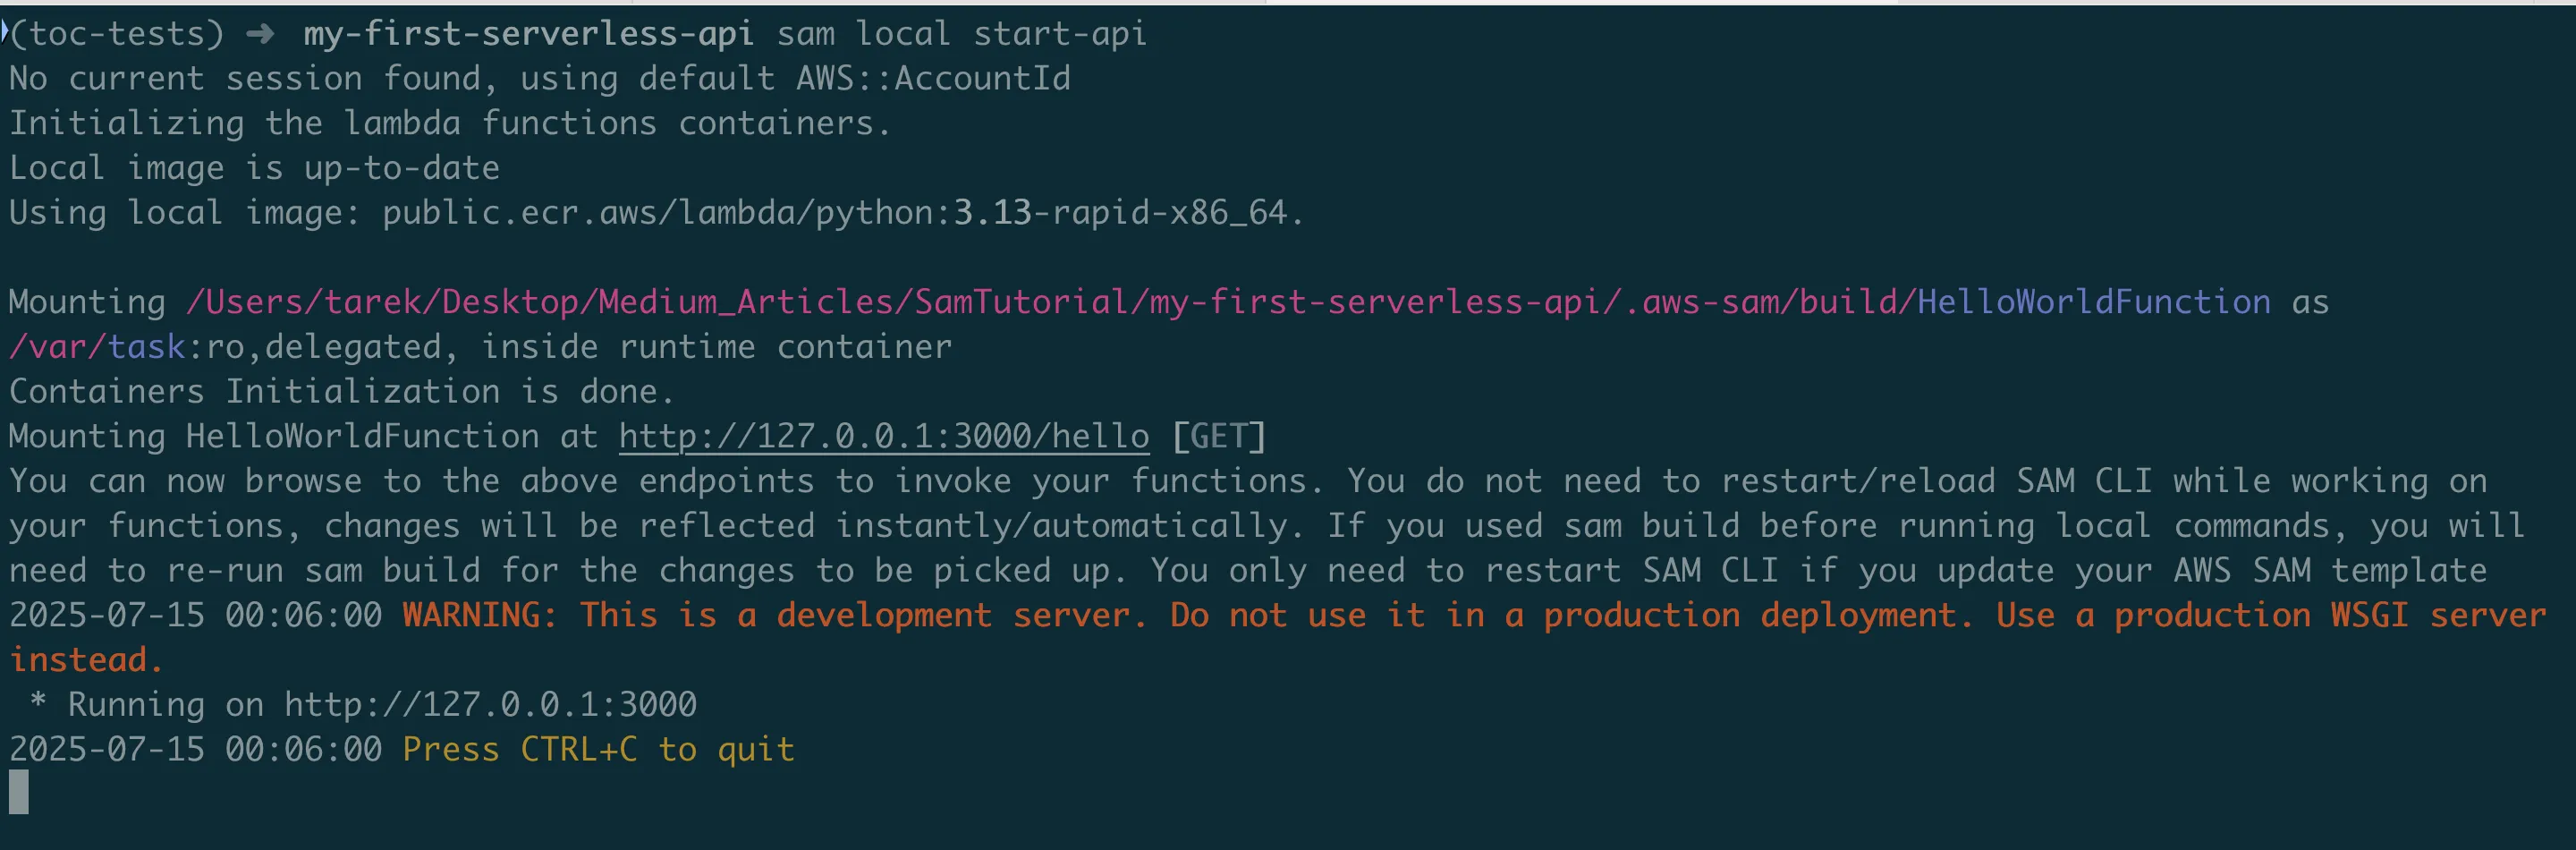
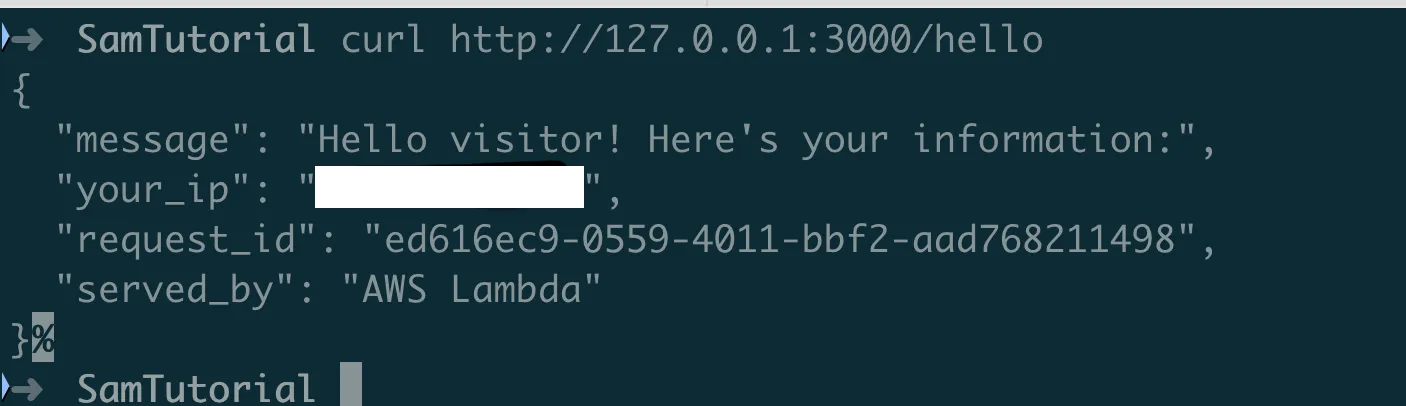
Test it in your browser: Go to http://127.0.0.1:3000/hello
Or test with curl:
curl http://127.0.0.1:3000/helloYou should see your actual IP address! This proves your function is working and can make external API calls.
What if it doesn't work?
- "Docker not found": Install and start Docker Desktop
- "Port 3000 in use": Another program is using that port. Try
sam local start-api --port 3001 - Error in logs: Check the terminal output for error messages
Deploying to AWS (The Real Thing!)
Now let's deploy your function to AWS so anyone on the internet can use it.
Step 1: Deploy with Guided Setup
For your first deployment, use the guided mode:
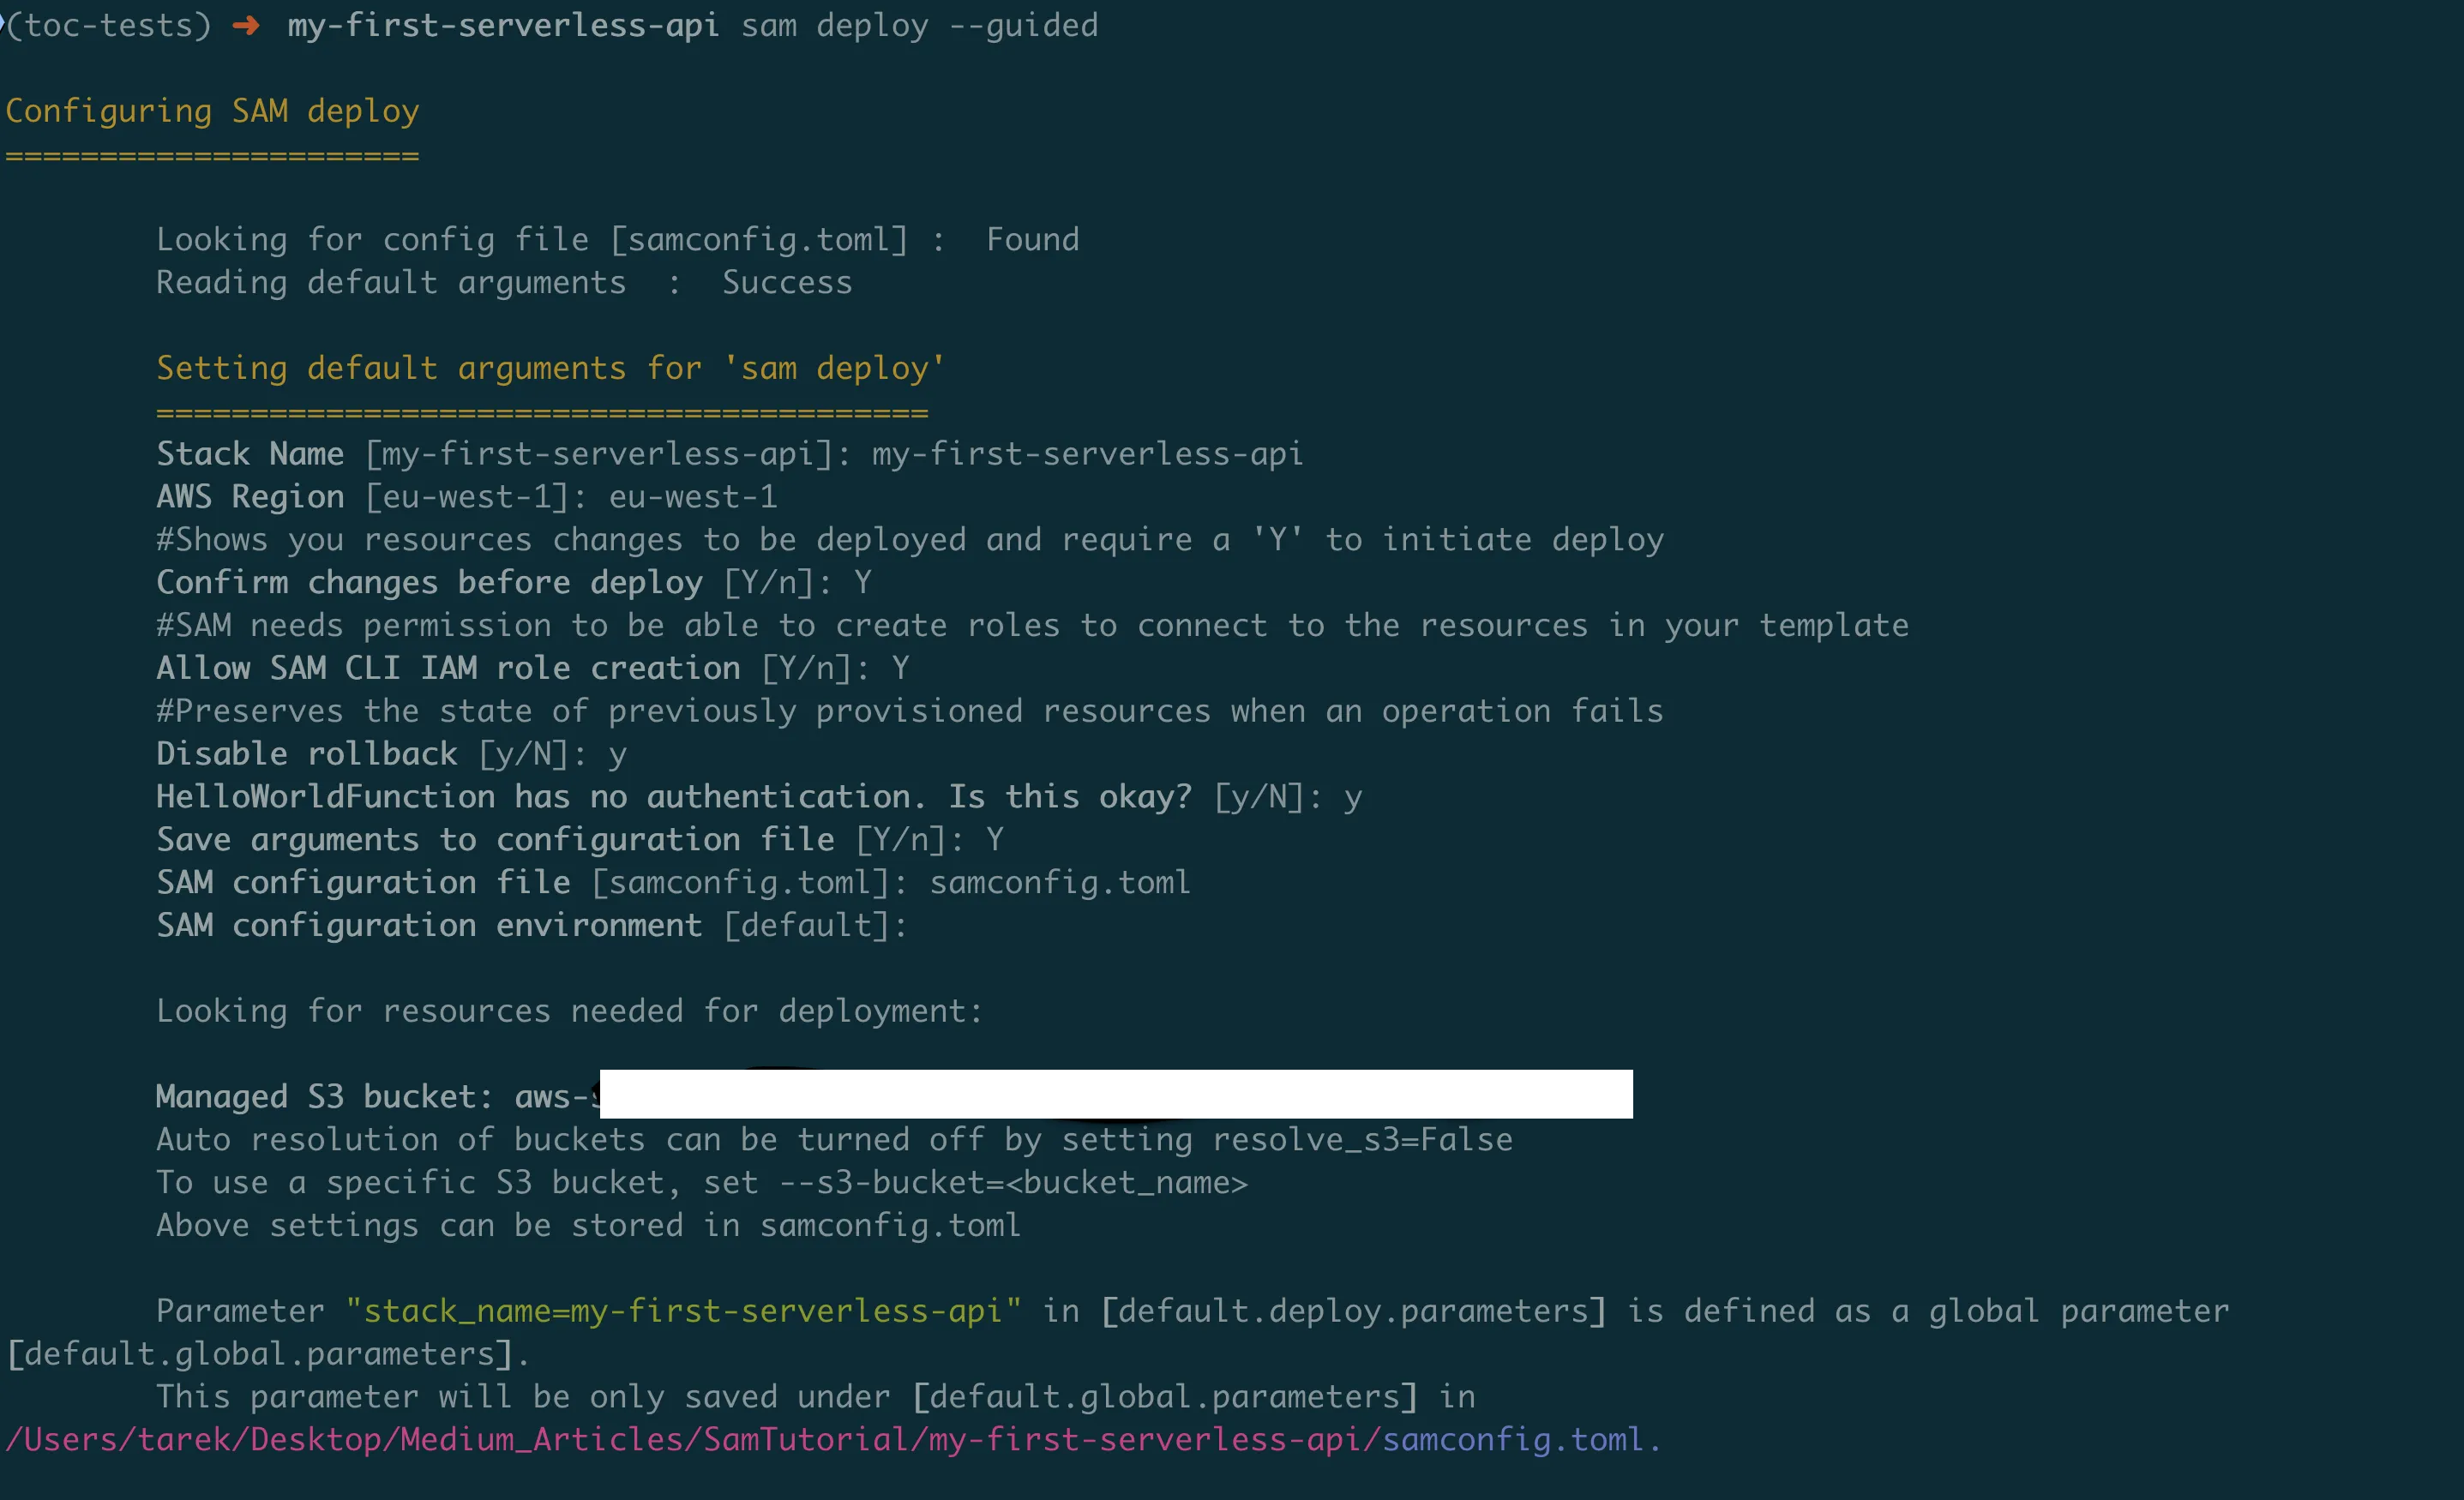
sam deploy --guidedSAM will ask you several questions:
Stack Name:
Stack Name [sam-app]: my-first-serverless-apiThis is the name AWS uses to group all your resources. Choose something descriptive.
AWS Region:
AWS Region [eu-west-1]: eu-west-1Where in the world to deploy. eu-west-1 (in my case). us-east-1 is usually cheapest and fastest for most people.
Confirm changes before deploy:
Confirm changes before deploy [Y/n]: YType Y. This shows you what AWS will create before doing it.
Allow SAM CLI IAM role creation:
Allow SAM CLI IAM role creation [Y/n]: YType Y. Your Lambda function needs permissions to run and write logs. SAM creates the minimal permissions needed.
Disable rollback:
Disable rollback [y/N]: yType y. If deployment fails, this leaves resources in place for debugging (helpful during development).
HelloWorldFunction may not have authorization:
HelloWorldFunction has no authentication. Is this okay? [y/N]: yType y. This means your API is publicly accessible (which is what we want).
Save parameters to configuration file:
Save arguments to configuration file [Y/n]: YType Y. This saves your choices so next time you can just run sam deploy without the questions.
Step 2: Watch the Deployment
SAM will show you everything it's creating:
CloudFormation outputs from deployed stack
Key                 HelloWorldApi
Description         API Gateway endpoint URL for Prod stage for Hello World function
Value               https://119o7zsewj.execute-api.eu-west-1.amazonaws.com/Prod/hello/
What is each thing?
- IAM Role: Permissions for your function to write logs
- Lambda Function: Your actual code
- API Gateway RestApi: The web API that receives HTTP requests
- API Gateway Deployment: Publishes your API configuration
- API Gateway Stage: Creates the "Prod" environment
Step 3: Deployment Complete!
After successful deployment, you'll see:
Key                 HelloWorldApi
Description         API Gateway endpoint URL for Prod stage for Hello World function
Value               https://119o7zsewj.execute-api.eu-west-1.amazonaws.com/Prod/hello/
That URL is your live API! Copy it and test it:
curl https://119o7zsewj.execute-api.eu-west-1.amazonaws.com/Prod/hello/You should see:
{
  "message": "Hello! Here's your information:",
  "your_ip": "203.0.113.1",
  "request_id": "12345-67890",
  "served_by": "AWS Lambda"
}
Congratulations! You've deployed a serverless API that's live on the internet!

Testing Your Live API
Let's test your API thoroughly to make sure it works correctly.
Basic Testing
Test in your browser: Just paste your API URL into your browser's address bar. You should see JSON response with your IP address.
Test with different tools:
# Using curl (command line)
curl https://your-api-url.amazonaws.com/Prod/hello/

# Using httpie (more user-friendly)
pip install httpie
http GET https://your-api-url.amazonaws.com/Prod/hello/
Understanding the Response
Your API returns something like:
{
  "message": "Hello! Here's your information:",
  "your_ip": "203.0.113.1",
  "request_id": "a1b2c3d4-e5f6-7890-abcd-ef1234567890",
  "served_by": "AWS Lambda"
}
What each field means:
- message: Your greeting
- your_ip: The public IP address of whoever called your API
- request_id: A unique request ID (useful for debugging)
- served_by: Confirms this came from Lambda
Checking the Logs
Want to see what happened behind the scenes?
sam logs -n HelloWorldFunction --tailThis shows:
- When your function was called
- Your
logger.info()messages - Any errors that occurred
- Performance metrics
What About Costs?
The good news: Your API will likely cost nothing or just a few cents.
AWS Free Tier includes:
- 1 million Lambda requests per month
- 400,000 GB-seconds of compute time per month
- 1 million API Gateway requests per month
For perspective: If someone calls your API once per second for an entire month, that's only 2.6 million requests. You'd pay about $1.
Making Changes and Redeploying
Let's add a feature to show how easy it is to update your API.
Adding Query Parameters
Let's modify our function to accept a name parameter. Edit hello_world/app.py:
def lambda_handler(event, context):
    logger.info("Someone called our API!")

    # Get query parameters from the request
    query_params = event.get('queryStringParameters') or {}
    name = query_params.get('name', 'visitor')

    try:
        # ... existing IP fetching code ...

        # Create personalized response
        response_data = {
            "message": f"Hello {name}! Here's your information:",
            "your_ip": public_ip,
            "request_id": context.aws_request_id,
            "served_by": "AWS Lambda"
        }

        # ... rest of the function stays the same ...
What did we add?
query_params = event.get('queryStringParameters') or {}
name = query_params.get('name', 'visitor')
Explanation:
event.get('queryStringParameters')gets the query parameters from the URLor {}provides an empty dictionary if there are no parameters.get('name', 'visitor')gets the 'name' parameter, or uses 'visitor' as default
Deploy the Update
sam build
sam deploy
Notice: No questions this time! SAM remembers your previous answers.
Test the New Feature
# Test without name parameter
curl https://your-api-url.amazonaws.com/Prod/hello/

# Test with name parameter
curl "https://your-api-url.amazonaws.com/Prod/hello/?name=Alice"
You should see:
{
  "message": "Hello Alice! Here's your information:",
  "your_ip": "203.0.113.1",
  "request_id": "...",
  "served_by": "AWS Lambda"
}
When Things Go Wrong (Debugging)
Let's prepare you for common issues and how to fix them.
Common Error Messages
"Internal Server Error" (HTTP 500)
This usually means there's a bug in your Python code.
# Check the logs
sam logs -n HelloWorldFunction --tail

# Look for Python tracebacks like:
# [ERROR] NameError: name 'unknown_variable' is not defined
"Timeout" errors
Your function took longer than 3 seconds.
Solution: Increase timeout in template.yaml:
Globals:
  Function:
    Timeout: 10  # 10 seconds instead of 3
"Unable to import module" errors
Usually means missing dependencies.
Solution: Make sure requirements.txt lists all packages you import.
Debugging Tips
1. Use lots of logging:
logger.info(f"Received event: {event}")
logger.info(f"About to call external API...")
logger.info(f"External API returned: {response.status_code}")
2. Test locally first:
sam local invoke HelloWorldFunction --event events/event.json3. Check CloudWatch logs in AWS Console:
- Go to AWS Console → CloudWatch → Log groups
- Find
/aws/lambda/your-function-name - Click on the latest log stream
4. Use the AWS Console Lambda testing:
- Go to AWS Console → Lambda → Your function
- Click "Test" tab
- Create a test event
- Run and see results immediately
Performance Monitoring
Check function metrics:
# See recent invocations
aws logs describe-log-groups --log-group-name-prefix "/aws/lambda/"

# Get function configuration
aws lambda get-function-configuration --function-name your-function-name
In the AWS Console:
- Lambda → Your function → Monitoring tab
- See graphs for invocations, duration, errors, throttles
Cleaning Up (Important!)
When you're done experimenting, clean up to avoid charges:
sam deleteSAM will ask:
Are you sure you want to delete the stack my-first-serverless-api in the region eu-west-1? [y/N]: y
Are you sure you want to delete the folder my-first-serverless-api in S3 which contains the artifacts? [y/N]: y
Type y to both.
What gets deleted:
- Your Lambda function
- The API Gateway
- IAM roles
- CloudWatch log groups
- All deployment artifacts
Verify cleanup:
aws lambda list-functions --query "Functions[?contains(FunctionName, 'my-first-serverless-api')]"Should return an empty list: []
What You've Accomplished
Let's recap what you've learned and built:
You Now Know How To:
- Create a serverless API from scratch
- Test locally before deploying (saving time and money)
- Deploy to AWS with confidence
- Handle errors gracefully
- Monitor and debug your functions
- Make updates and redeploy
- Clean up resources to avoid charges
Technical Skills You've Gained:
- AWS Lambda — Running code without servers
- API Gateway — Creating web APIs
- SAM CLI — Serverless development workflow
- Infrastructure as Code — Defining resources in template.yaml
- Error handling — Making robust applications
- Logging and debugging — Troubleshooting production issues
Why This Matters:
For your career: Serverless is increasingly popular. These skills are valuable.
For your projects: You can now build APIs that:
- Cost almost nothing to run
- Scale automatically
- Require minimal maintenance
- Can be deployed in minutes
For learning: You understand the fundamentals. You can now:
- Build more complex APIs
- Connect to databases
- Process files and images
- Create scheduled tasks
- Build entire applications
What's Next?
You've mastered the basics. Here are natural next steps:
Level 2: Add a Database
What: Connect your API to a database to store and retrieve data.
How: Add DynamoDB to your template.yaml and use boto3 to interact with it.
Why: Most real applications need to persist data.
Level 3: File Processing
What: Create functions that process uploaded files (resize images, parse CSV files, etc.).
How: Use S3 events to trigger your Lambda when files are uploaded.
Why: Very common use case for serverless.
Level 4: Authentication
What: Protect your API so only authorized users can access it.
How: Use AWS Cognito or API keys.
Why: Most production APIs need security.
Level 5: Multiple Functions
What: Build a complete application with multiple interconnected functions.
How: Create multiple functions in one SAM template, each with different responsibilities.
Why: Real applications are composed of many small services.
Resources for Continued Learning
Essential Documentation
- AWS SAM Documentation — Official comprehensive guide
- AWS Lambda Python Guide — Python-specific Lambda features
- API Gateway Documentation — Advanced API features
Hands-On Learning
- AWS Serverless Workshops — Free hands-on labs
- SAM Examples — Real-world templates
- Serverless Patterns — Common architectural patterns
Community
- AWS Community Forums — Get help from other developers
- r/aws subreddit — Discussions and tips
Books and Courses
- "Serverless Development on AWS: Building Enterprise-Scale Serverless Solutions" by Sheen Brisals and Luke Hedger — Building Serverless Solutions
- AWS Training and Certification — Official AWS courses
Congratulations!
You've just built and deployed your first serverless API! More importantly, you understand how it all works.
Remember:
- Start small and iterate
- Test locally before deploying
- Use logging liberally for debugging
- Don't forget to clean up resources
- The serverless community is helpful — don't hesitate to ask questions
You're now equipped to:
- Build APIs that scale automatically
- Create applications that cost almost nothing to run
- Deploy globally in minutes
- Focus on business logic instead of infrastructure
The future is serverless, and you're ready for it!
Found this helpful? Share it with fellow developers who want to learn serverless!
Happy building!
Go Deeper: The State of AWS Security 2026
This article is just the start. Get the full picture with our free whitepaper - 8 chapters covering IAM, S3, VPC, monitoring, agentic AI security, compliance, and a prioritized action plan with 50+ CLI commands.
Toc Consulting: AWS Security & Cloud Architecture
Want expert help with Serverless?
Our team helps engineering teams secure and architect AWS the right way: assessment in week one, a prioritized action plan in week two.
More Articles
Building a Production-Ready Serverless File Sharing Platform on AWS
How I built a secure, scalable file sharing solution using AWS Lambda, API Gateway, and Cognito with zero infrastructure to manage and 91% cost reduction.
Stop Reinventing Authentication: How I Built a Production-Ready Auth API That Scales to 50K Users for Free
How I built CognitoApi, an open-source serverless authentication API on AWS Cognito that handles 50,000 users for free with MFA, token management, and complete user lifecycle support.
Chaos Engineering on AWS: Running a Program with GameDays and Continuous Chaos
One experiment is a demo. A program is what builds resilience. Turn FIS experiments into an ongoing practice: the resilience flywheel, GameDays, continuous automated chaos on a schedule and in CI/CD, and AWS Resilience Hub. Includes a real, validated EventBridge Scheduler setup and the jsonencode gotcha that makes a recurring schedule silently run only once.