
EC2 Networking and Security: Build Bulletproof Cloud Infrastructure
Tarek Cheikh
Founder & AWS Cloud Architect
In the previous articles, we launched EC2 instances and selected the right instance types. But an instance is only as secure as the network it sits in. A misconfigured security group or a database in a public subnet can expose your entire infrastructure.
This article covers the networking and security foundations that every EC2 deployment needs: VPCs, subnets, route tables, security groups, NACLs, NAT gateways, load balancers, SSH hardening, VPC endpoints, and how to assemble them into a production-grade architecture.
VPC: Your Private Network in AWS
A Virtual Private Cloud (VPC) is an isolated network environment within AWS. Every EC2 instance runs inside a VPC. You control the IP address range, subnets, route tables, and network gateways. No traffic can enter or leave your VPC unless you explicitly allow it.
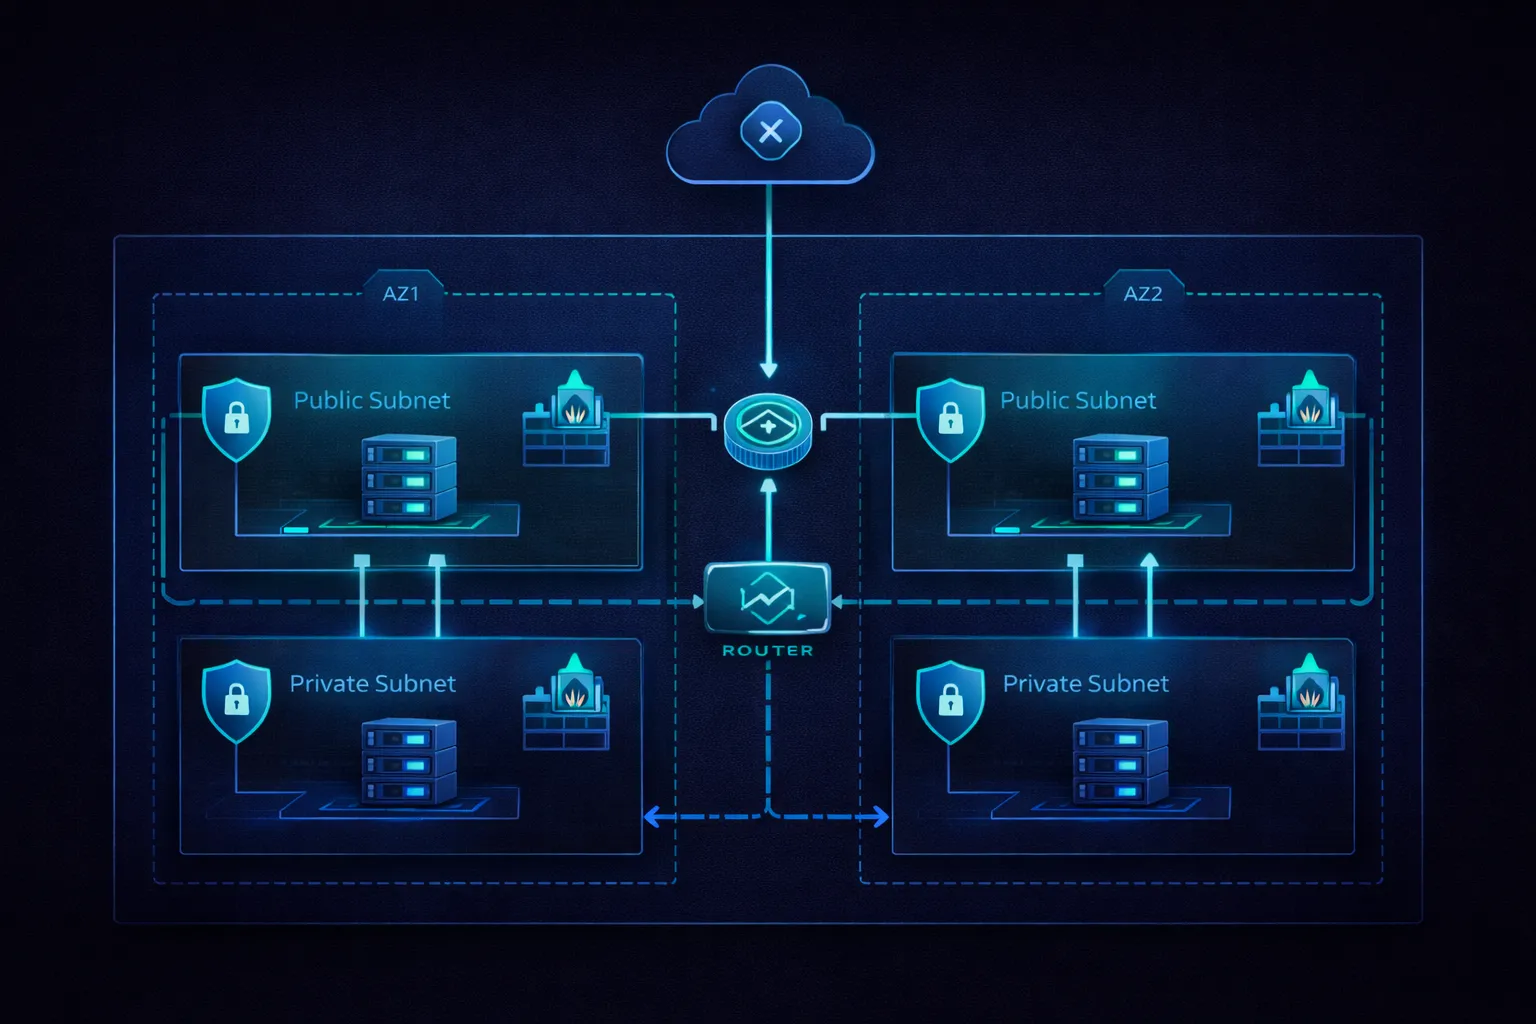
VPC Architecture Components
VPC (10.0.0.0/16)
+-- Internet Gateway (IGW)
+-- Public Subnets
|   +-- 10.0.1.0/24 (AZ us-east-1a) -- web servers, load balancers
|   +-- 10.0.2.0/24 (AZ us-east-1b) -- web servers, load balancers
+-- Private Subnets
|   +-- 10.0.3.0/24 (AZ us-east-1a) -- application servers
|   +-- 10.0.4.0/24 (AZ us-east-1b) -- application servers
+-- Database Subnets
|   +-- 10.0.5.0/24 (AZ us-east-1a) -- RDS, ElastiCache
|   +-- 10.0.6.0/24 (AZ us-east-1b) -- RDS, ElastiCache
+-- NAT Gateways (in public subnets, used by private subnets)
+-- Route Tables (one per subnet tier)
+-- Security Groups (per instance/service)
+-- Network ACLs (per subnet)
Why VPCs matter:
- Network isolation: Complete separation from other AWS customers and from your other VPCs
- IP address control: Define your own IP ranges, avoiding conflicts with on-premises networks
- Subnet segmentation: Separate application tiers (web, app, database) into different subnets
- Security boundaries: Control exactly which traffic can flow between components
- Compliance: Meet regulatory requirements for data isolation and network segmentation
CIDR Blocks: IP Address Planning
CIDR (Classless Inter-Domain Routing) notation defines IP address ranges for your VPC and subnets.
# Common VPC sizes
10.0.0.0/16    # 65,536 addresses -- recommended for most deployments
10.0.0.0/20    # 4,096 addresses  -- smaller environments
10.0.0.0/24    # 256 addresses    -- minimal VPCs

# Subnet breakdown within a /16 VPC
10.0.1.0/24    # 256 addresses per subnet (251 usable, AWS reserves 5)
10.0.2.0/24    # Each /24 subnet can hold ~250 instances
10.0.3.0/24    # Allocate at least 2 subnets per tier for multi-AZ
CIDR planning best practices:
- Start with /16: Gives you room to grow. Shrinking a VPC CIDR later is not possible.
- Avoid overlap: If you have on-premises networks at 10.0.0.0/16, use 10.1.0.0/16 for AWS. Overlapping CIDRs prevent VPC peering and VPN connectivity.
- Use RFC 1918 ranges: 10.0.0.0/8, 172.16.0.0/12, or 192.168.0.0/16.
- Reserve space: Do not allocate all subnets immediately. Leave room for future tiers (management, monitoring, etc.).
- Document everything: Maintain a network diagram showing all CIDRs, subnets, and their purposes.
Subnets and Route Tables
A subnet is a range of IP addresses within your VPC, tied to a single Availability Zone. The key distinction in AWS networking is between public subnets and private subnets, and this distinction is determined entirely by the route table.
Public Subnets
Public subnet characteristics:
  - Route table has a route to the Internet Gateway (0.0.0.0/0 -> igw-xxxxx)
  - Instances CAN have public IP addresses
  - Directly reachable from the internet (if security groups allow it)
  - Used for: load balancers, bastion hosts, NAT gateways

Public Route Table:
  Destination        Target          Notes
  10.0.0.0/16        local           Traffic within the VPC
  0.0.0.0/0          igw-12345678    Internet-bound traffic goes to IGW
Private Subnets
Private subnet characteristics:
  - Route table has NO route to the Internet Gateway
  - Instances have private IPs only (no public IP)
  - NOT directly reachable from the internet
  - Outbound internet access via NAT Gateway (for updates, API calls)
  - Used for: application servers, databases, backend services

Private Route Table:
  Destination        Target          Notes
  10.0.0.0/16        local           Traffic within the VPC
  0.0.0.0/0          nat-12345678    Outbound internet via NAT Gateway

Database Route Table (most restrictive):
  Destination        Target          Notes
  10.0.0.0/16        local           VPC traffic only -- no internet route at all
The database subnet has no route to the internet whatsoever. Instances in this subnet can only communicate with other instances inside the VPC. This is the correct configuration for databases -- they should never need to reach the internet directly.
Internet Gateway and NAT Gateway
Internet Gateway (IGW)
An Internet Gateway enables communication between instances in your VPC and the internet. It is horizontally scaled, redundant, and has no bandwidth constraints. There is no additional charge for an IGW itself.
Key points:
- One IGW per VPC
- Supports both IPv4 and IPv6
- An instance needs both a public IP and a route to the IGW to be reachable from the internet
- The IGW performs network address translation (NAT) for instances with public IPs
NAT Gateway
A NAT Gateway allows instances in private subnets to initiate outbound connections to the internet (for software updates, API calls, etc.) while preventing inbound connections from the internet.
NAT Gateway setup:
  1. Create NAT Gateway in a PUBLIC subnet
  2. Assign an Elastic IP to the NAT Gateway
  3. Add a route in the PRIVATE subnet's route table: 0.0.0.0/0 -> nat-xxxxx

Traffic flow (private instance fetching updates):
  Private instance (10.0.3.15)
    -> Private route table (0.0.0.0/0 -> nat-xxxxx)
    -> NAT Gateway (translates source IP to its Elastic IP)
    -> Internet Gateway
    -> Internet

Return traffic follows the reverse path. The NAT Gateway tracks the connection
state, so return packets are delivered back to the originating private instance.
NAT Gateway vs NAT Instance:
Feature NAT Gateway NAT Instance
Availability Highly available (managed) Manual HA setup required
Bandwidth Up to 100 Gbps Limited by instance type
Management Fully managed by AWS You manage patching, scaling
Cost ~$0.045/hr + data transfer Instance cost + data transfer
Security groups Not configurable Custom security groups
Recommendation Use NAT Gateway Only for very tight budgetsFor production environments, always use a managed NAT Gateway. Deploy one per Availability Zone for high availability.
Security Groups: Instance-Level Firewall
Security Groups are the primary network security mechanism for EC2 instances. They act as a virtual firewall controlling inbound and outbound traffic at the instance level.
Key Characteristics
- Stateful: If you allow inbound traffic on port 80, the return traffic is automatically allowed. You do not need separate outbound rules for response traffic.
- Allow rules only: You can only create rules that allow traffic. There are no deny rules. Everything not explicitly allowed is denied by default.
- Instance-level: Each instance can have up to 5 security groups. Rules from all groups are aggregated.
- Dynamic: Changes take effect immediately, no restart needed.
- Reference other security groups: Instead of hardcoding IP addresses, you can reference another security group as the source. This is the recommended approach for inter-tier communication.
Three-Tier Architecture Pattern
The most common security group pattern separates web, application, and database tiers:
# Web Tier Security Group (sg-web)
Inbound:
  TCP 80   from 0.0.0.0/0          # HTTP from internet
  TCP 443  from 0.0.0.0/0          # HTTPS from internet
  TCP 22   from sg-bastion          # SSH from bastion only
Outbound:
  All traffic to 0.0.0.0/0         # Default: allow all outbound

# Application Tier Security Group (sg-app)
Inbound:
  TCP 8080 from sg-web              # App traffic from web tier only
  TCP 22   from sg-bastion          # SSH from bastion only
Outbound:
  TCP 3306 to sg-db                 # MySQL to database tier
  TCP 443  to 0.0.0.0/0            # HTTPS to external APIs

# Database Tier Security Group (sg-db)
Inbound:
  TCP 3306 from sg-app              # MySQL from app tier only
Outbound:
  None                              # No outbound needed

# Bastion Security Group (sg-bastion)
Inbound:
  TCP 22   from 203.0.113.0/24     # SSH from your office IP range only
Outbound:
  TCP 22   to 10.0.0.0/16          # SSH to any instance in the VPC
Notice that each tier only accepts traffic from the tier above it, and the source is specified as a security group reference, not an IP address. This means if you add or remove instances in the web tier, the app tier rules automatically apply to them.
Microservices Pattern
# Each microservice gets its own security group
# Services only accept traffic from the services that need to call them

sg-api-gateway:
  Inbound: TCP 443 from 0.0.0.0/0

sg-user-service:
  Inbound: TCP 3000 from sg-api-gateway

sg-order-service:
  Inbound: TCP 3001 from sg-api-gateway
  Inbound: TCP 3001 from sg-user-service

sg-payment-service:
  Inbound: TCP 3002 from sg-order-service     # Only order service can call payment
  # NOT from sg-api-gateway -- payment is not directly accessible
Security Group Best Practices
- Principle of least privilege: Only open the ports that are actually needed. Never use 0.0.0.0/0 for SSH (port 22).
- Reference security groups, not IPs: This makes rules dynamic and maintainable.
- Use descriptive names and descriptions: Name groups like
prod-web-tier-sgand describe each rule's purpose. - Audit regularly: Review security groups monthly. Remove rules that are no longer needed.
- Separate environments: Different security groups for dev, staging, and production.
- Restrict outbound where possible: The default allows all outbound traffic. For sensitive workloads, restrict outbound to only the destinations needed.
Network ACLs: Subnet-Level Firewall
Network ACLs (NACLs) provide an additional layer of security at the subnet level. They complement security groups but work differently.
NACLs vs Security Groups
Feature              Network ACLs             Security Groups
Level                Subnet                   Instance
Statefulness         Stateless                Stateful
Rule types           Allow AND Deny           Allow only
Default behavior     Allow all (default NACL) Deny all (new SG)
Rule processing      Numbered order (lowest   All rules evaluated
                     number wins)             together
Return traffic       Must be explicitly       Automatically allowed
                     allowed (ephemeral ports)
The most important difference: NACLs are stateless. If you allow inbound TCP 80, you must also allow outbound traffic on ephemeral ports (1024-65535) for the response. This catches many people by surprise.
When to Use NACLs
For most deployments, security groups alone are sufficient. Add NACLs when you need:
- Explicit deny rules: Block a specific IP range or port that security groups cannot deny
- Subnet-level blocking: Block all traffic from a known malicious CIDR regardless of security group configuration
- Compliance requirements: Some standards (PCI DSS, HIPAA) require defense-in-depth with multiple firewall layers
- Subnet isolation: Prevent entire subnets from communicating with each other
NACL Example
# Public subnet NACL
Inbound Rules:
  Rule 100: ALLOW TCP 80   from 0.0.0.0/0        # HTTP
  Rule 110: ALLOW TCP 443  from 0.0.0.0/0        # HTTPS
  Rule 120: ALLOW TCP 22   from 203.0.113.0/24   # SSH from office
  Rule 130: ALLOW TCP 1024-65535 from 0.0.0.0/0  # Ephemeral (return traffic)
  Rule *:   DENY  ALL      from 0.0.0.0/0        # Default deny

Outbound Rules:
  Rule 100: ALLOW TCP 80   to 0.0.0.0/0          # HTTP responses
  Rule 110: ALLOW TCP 443  to 0.0.0.0/0          # HTTPS responses
  Rule 120: ALLOW TCP 1024-65535 to 0.0.0.0/0    # Ephemeral (responses)
  Rule *:   DENY  ALL      to 0.0.0.0/0          # Default deny
The ephemeral port range (1024-65535) is critical for NACLs. Without it, response traffic for allowed inbound connections will be dropped. This is the most common NACL misconfiguration.
SSH Security and Key Management
SSH Key Pairs
SSH key pairs provide passwordless authentication to EC2 instances. The private key stays on your machine; the public key is installed on the instance.
# Generate a new key pair (RSA 4096-bit)
ssh-keygen -t rsa -b 4096 -f ~/.ssh/prod-key -C "production access"

# Or use Ed25519 (shorter keys, equally secure, faster)
ssh-keygen -t ed25519 -f ~/.ssh/prod-key -C "production access"

# Set proper file permissions
chmod 600 ~/.ssh/prod-key        # Private key: owner read/write only
chmod 644 ~/.ssh/prod-key.pub    # Public key: readable by others

# Connect to an instance
ssh -i ~/.ssh/prod-key ec2-user@54.123.45.67
SSH Configuration File
Use ~/.ssh/config to avoid typing long SSH commands:
# ~/.ssh/config

# Bastion host (jump box)
Host bastion
    HostName 54.123.45.68
    User ec2-user
    IdentityFile ~/.ssh/bastion-key
    Port 2222
    ForwardAgent no

# Production web server (accessed through bastion)
Host prod-web
    HostName 10.0.3.15
    User ec2-user
    IdentityFile ~/.ssh/prod-key
    ProxyJump bastion
    StrictHostKeyChecking yes

# Usage: just type "ssh prod-web" to connect through bastion automatically
SSH Daemon Hardening
Harden the SSH daemon on your instances by editing /etc/ssh/sshd_config:
# /etc/ssh/sshd_config -- recommended hardening

Port 2222                          # Change from default 22 (reduces automated scans)
PermitRootLogin no                 # Never allow direct root login
PasswordAuthentication no          # Disable password auth, keys only
PubkeyAuthentication yes           # Enable key-based auth
MaxAuthTries 3                     # Limit authentication attempts
ClientAliveInterval 300            # Send keepalive every 5 minutes
ClientAliveCountMax 2              # Disconnect after 2 missed keepalives
AllowUsers ec2-user                # Whitelist specific users
LoginGraceTime 30                  # 30 seconds to authenticate
X11Forwarding no                   # Disable X11 forwarding
AllowTcpForwarding no              # Disable TCP forwarding (unless needed)
PermitEmptyPasswords no            # Never allow empty passwords

# After editing, restart sshd:
# sudo systemctl restart sshd
Bastion Host Pattern
A bastion host (jump box) is the single entry point for SSH access to instances in private subnets. This eliminates the need to expose private instances to the internet.
Admin workstation
       |
       | SSH (port 2222, from office IP only)
       v
  Bastion Host (public subnet)
       |
       | SSH (port 22, within VPC only)
       v
  Private instances (private subnets)
       |
       v
  Audit logs (CloudTrail, Session Manager logs)
Bastion host security:
- Hardened AMI with minimal software installed
- SSH key-based authentication only
- Security group restricts SSH to your office IP range
- All sessions logged via CloudTrail or Session Manager
- Regular patching and security updates
- Consider using AWS Systems Manager Session Manager instead (see below)
AWS Systems Manager Session Manager
Session Manager is a managed alternative to bastion hosts. It provides shell access to instances without SSH keys, open ports, or bastion hosts.
# Session Manager advantages:
#   - No SSH keys to manage
#   - No port 22 needed in security groups
#   - No bastion host to maintain
#   - Browser-based or CLI access
#   - Full session logging to S3/CloudWatch
#   - IAM-based access control (who can access which instances)

# Prerequisites:
# 1. SSM Agent installed on instance (pre-installed on Amazon Linux 2/2023)
# 2. Instance has IAM role with AmazonSSMManagedInstanceCore policy
# 3. Instance has outbound HTTPS (443) to SSM endpoints

# Start a session via CLI:
aws ssm start-session --target i-1234567890abcdef0

# Start a session via AWS Console:
# EC2 > Instances > Select instance > Connect > Session Manager
For new deployments, prefer Session Manager over bastion hosts. It eliminates an entire class of security concerns (SSH key management, bastion patching, port exposure).
Elastic IP Addresses
An Elastic IP (EIP) is a static public IPv4 address that you can associate with an instance. Unlike auto-assigned public IPs, an EIP persists across instance stop/start cycles.
# Allocate an Elastic IP
aws ec2 allocate-address --domain vpc

# Associate with an instance
aws ec2 associate-address \
    --instance-id i-1234567890abcdef0 \
    --allocation-id eipalloc-12345678

# Release when no longer needed
aws ec2 release-address --allocation-id eipalloc-12345678
When to use Elastic IPs:
- DNS records pointing to a fixed IP
- External firewall rules that require a consistent source IP
- Quick failover (reassign EIP from a failed instance to a healthy one)
Important pricing note: Since February 2024, AWS charges $0.005/hour ($3.60/month) for every public IPv4 address, including Elastic IPs attached to running instances. Previously, attached EIPs were free. Unattached or idle EIPs cost the same $0.005/hour. Release EIPs you are not using, and prefer load balancers or DNS-based solutions over multiple EIPs.
VPC Peering and Transit Gateway
VPC Peering
VPC Peering creates a direct network connection between two VPCs, allowing instances in either VPC to communicate using private IP addresses as if they were in the same network.
# Peering example:
# VPC A: 10.0.0.0/16 (us-east-1) -- production
# VPC B: 10.1.0.0/16 (us-east-1) -- shared services

# Route table in VPC A:
  10.0.0.0/16 -> local
  10.1.0.0/16 -> pcx-12345678    # Peering connection to VPC B

# Route table in VPC B:
  10.1.0.0/16 -> local
  10.0.0.0/16 -> pcx-12345678    # Peering connection to VPC A
VPC Peering limitations:
- No transitive routing: If VPC A peers with VPC B, and VPC B peers with VPC C, VPC A cannot reach VPC C through VPC B. Each pair needs its own peering connection.
- No overlapping CIDRs: The two VPCs must have non-overlapping IP ranges.
- Cross-region supported: Peering works across AWS regions (with slightly higher latency).
Transit Gateway
Transit Gateway is a hub that connects multiple VPCs and on-premises networks through a single gateway. It solves the scalability problem of VPC peering (which requires N*(N-1)/2 connections for N VPCs).
Hub-and-Spoke Model:

                    Transit Gateway (tgw-xxxxx)
                   /        |        \
                  /         |         \
  VPC A (10.0.0.0/16)  VPC B (10.1.0.0/16)  VPC C (10.2.0.0/16)
                          |
                    On-premises (192.168.0.0/16)
                    (via VPN or Direct Connect)

All VPCs can communicate through the Transit Gateway.
On-premises network can reach any VPC.
Centralized route management.
Use VPC Peering for simple two-VPC connections. Use Transit Gateway when you have 3+ VPCs or need connectivity to on-premises networks.
VPC Endpoints: Private Access to AWS Services
By default, when an EC2 instance calls an AWS service (S3, DynamoDB, SQS, etc.), the traffic goes through the internet -- even though both the instance and the service are in AWS. VPC Endpoints keep this traffic on the AWS private network.
Gateway Endpoints (S3 and DynamoDB)
# Create a Gateway Endpoint for S3
aws ec2 create-vpc-endpoint \
    --vpc-id vpc-12345678 \
    --service-name com.amazonaws.us-east-1.s3 \
    --route-table-ids rtb-12345678

# This adds a route to the route table:
# Destination: pl-xxxxx (S3 prefix list)  Target: vpce-xxxxx

# No charge for Gateway Endpoints
# Traffic stays on AWS backbone network
# Works with S3 bucket policies for additional security
Interface Endpoints (Most Other AWS Services)
# Create an Interface Endpoint for SSM (Systems Manager)
aws ec2 create-vpc-endpoint \
    --vpc-id vpc-12345678 \
    --service-name com.amazonaws.us-east-1.ssm \
    --vpc-endpoint-type Interface \
    --subnet-ids subnet-12345678 \
    --security-group-ids sg-12345678

# Interface Endpoints create an ENI in your subnet with a private IP
# DNS resolves the service endpoint to this private IP
# Cost: ~$0.01/hr per AZ + data processing charges
VPC Endpoints are especially important for instances in private subnets with no NAT Gateway. They provide private access to AWS services without any internet connectivity.
Load Balancers
Load balancers distribute incoming traffic across multiple EC2 instances, improving availability and fault tolerance.
Application Load Balancer (ALB)
ALB operates at Layer 7 (HTTP/HTTPS) and provides advanced routing capabilities:
ALB features:
  - HTTP/HTTPS load balancing with content-based routing
  - Path-based routing (/api/* -> API servers, /static/* -> cache servers)
  - Host-based routing (api.example.com -> API servers, www.example.com -> web servers)
  - WebSocket support
  - SSL/TLS termination (offload encryption from instances)
  - Integration with WAF, Cognito, and other AWS services
  - Health checks at the application level (HTTP GET /health)
  - Sticky sessions (cookie-based)

When to use ALB:
  - Web applications
  - REST APIs
  - Microservices architectures
  - Any HTTP/HTTPS workload
# ALB target group health check configuration
aws elbv2 create-target-group \
--name web-servers \
--protocol HTTP \
--port 80 \
--vpc-id vpc-12345678 \
--health-check-path /health \
--health-check-interval-seconds 30 \
--healthy-threshold-count 2 \
--unhealthy-threshold-count 3Network Load Balancer (NLB)
NLB operates at Layer 4 (TCP/UDP) and provides ultra-high performance:
NLB features:
  - TCP/UDP/TLS load balancing
  - Millions of requests per second
  - Ultra-low latency (single-digit milliseconds)
  - Static IP addresses per AZ (or Elastic IPs)
  - Preserves client source IP
  - No connection idle timeout

When to use NLB:
  - TCP-based protocols (databases, MQTT, gaming)
  - Ultra-low latency requirements
  - Static IP requirements
  - Non-HTTP workloads
  - Extreme throughput needs
Rule of thumb: if your traffic is HTTP/HTTPS, use ALB. For everything else (TCP, UDP, or extreme performance requirements), use NLB.
VPC Flow Logs
VPC Flow Logs capture information about IP traffic going to and from network interfaces in your VPC. They are essential for security monitoring, troubleshooting, and compliance.
# Enable Flow Logs for a VPC (publish to CloudWatch Logs)
aws ec2 create-flow-logs \
    --resource-type VPC \
    --resource-ids vpc-12345678 \
    --traffic-type ALL \
    --log-destination-type cloud-watch-logs \
    --log-group-name /vpc/flow-logs \
    --deliver-logs-permission-arn arn:aws:iam::123456789012:role/flow-logs-role

# Or publish to S3 (cheaper for high-volume logging)
aws ec2 create-flow-logs \
    --resource-type VPC \
    --resource-ids vpc-12345678 \
    --traffic-type ALL \
    --log-destination-type s3 \
    --log-destination arn:aws:s3:::my-flow-logs-bucket
Flow Log record format:
# Example flow log entries:
# version account-id interface-id srcaddr dstaddr srcport dstport protocol packets bytes start end action log-status

2 123456789012 eni-abc123 10.0.1.5 10.0.3.15 49761 3306 6 10 840 1620000000 1620000060 ACCEPT OK
2 123456789012 eni-abc123 203.0.113.50 10.0.1.5 12345 22 6 5 400 1620000000 1620000060 REJECT OK

# The first entry: accepted traffic from web tier to database (MySQL port 3306)
# The second entry: rejected SSH attempt from an external IP
Use Flow Logs to:
- Detect unauthorized access attempts (REJECT entries from unexpected sources)
- Troubleshoot connectivity issues (why can instance A not reach instance B?)
- Monitor traffic patterns for right-sizing and cost optimization
- Meet compliance requirements for network traffic logging
CloudWatch Monitoring for EC2
Built-in EC2 Metrics
Basic Monitoring (free, 5-minute intervals):
  - CPUUtilization
  - DiskReadOps / DiskWriteOps
  - DiskReadBytes / DiskWriteBytes
  - NetworkIn / NetworkOut
  - NetworkPacketsIn / NetworkPacketsOut
  - StatusCheckFailed (instance + system)

Detailed Monitoring ($2.10/month per instance, 1-minute intervals):
  - Same metrics at higher resolution
  - Better for Auto Scaling (faster reaction to load changes)
  - Required for some Auto Scaling policies
Note: EC2 does NOT natively report memory or disk space utilization to CloudWatch. You need the CloudWatch Agent for those:
# Install CloudWatch Agent
sudo yum install -y amazon-cloudwatch-agent

# The agent can publish:
#   - MemoryUtilization (percent)
#   - DiskSpaceUtilization (percent)
#   - Custom application metrics
# Metrics appear under the CWAgent namespace in CloudWatch
Essential CloudWatch Alarms
# High CPU alarm
aws cloudwatch put-metric-alarm \
    --alarm-name "High-CPU" \
    --metric-name CPUUtilization \
    --namespace AWS/EC2 \
    --statistic Average \
    --period 300 \
    --threshold 80 \
    --comparison-operator GreaterThanThreshold \
    --dimensions Name=InstanceId,Value=i-1234567890abcdef0 \
    --evaluation-periods 2 \
    --alarm-actions arn:aws:sns:us-east-1:123456789012:ops-alerts

# Instance status check alarm (auto-recover on failure)
aws cloudwatch put-metric-alarm \
    --alarm-name "Status-Check-Failed" \
    --metric-name StatusCheckFailed \
    --namespace AWS/EC2 \
    --statistic Maximum \
    --period 60 \
    --threshold 0 \
    --comparison-operator GreaterThanThreshold \
    --dimensions Name=InstanceId,Value=i-1234567890abcdef0 \
    --evaluation-periods 2 \
    --alarm-actions arn:aws:automate:us-east-1:ec2:recover
Defense in Depth: Putting It All Together
Defense in depth means applying security controls at every layer, so that a failure at one layer does not compromise the entire system.
Layer 1: Network (VPC)
  - Private subnets for sensitive workloads
  - Network ACLs for subnet-level deny rules
  - VPC Flow Logs for traffic monitoring
  - VPC Endpoints for private AWS service access
  - No unnecessary public IP addresses

Layer 2: Instance (Security Groups)
  - Least-privilege inbound rules
  - Security group references (not hardcoded IPs)
  - Separate groups per tier and environment
  - Restricted outbound where possible

Layer 3: Access
  - IAM roles on instances (never embed access keys)
  - Session Manager instead of SSH where possible
  - Bastion host with audit logging for SSH access
  - MFA for administrative access
  - Regular key rotation

Layer 4: Application
  - SSL/TLS encryption in transit
  - Web Application Firewall (WAF) for HTTP-based attacks
  - Application-level authentication and authorization
  - Input validation

Layer 5: Data
  - EBS encryption at rest (enabled by default in new accounts)
  - S3 encryption (SSE-S3, SSE-KMS)
  - RDS encryption at rest
  - KMS for key management
  - Backup and recovery procedures
Production Architecture Example
Here is a complete production-ready architecture combining all the concepts from this article:
VPC: 10.0.0.0/16 (us-east-1)

Public Subnets:
  10.0.1.0/24 (us-east-1a) -- ALB, NAT Gateway
  10.0.2.0/24 (us-east-1b) -- ALB, NAT Gateway

Private Subnets (App Tier):
  10.0.3.0/24 (us-east-1a) -- EC2 instances (Auto Scaling)
  10.0.4.0/24 (us-east-1b) -- EC2 instances (Auto Scaling)

Private Subnets (DB Tier):
  10.0.5.0/24 (us-east-1a) -- RDS primary
  10.0.6.0/24 (us-east-1b) -- RDS standby

Security Groups:
  sg-alb:     TCP 443 from 0.0.0.0/0
  sg-app:     TCP 8080 from sg-alb, TCP 22 from sg-bastion
  sg-db:      TCP 3306 from sg-app
  sg-bastion: TCP 22 from office CIDR

Route Tables:
  Public:   0.0.0.0/0 -> igw-xxxxx
  Private:  0.0.0.0/0 -> nat-xxxxx (per AZ)
  Database: No internet route (VPC-local only)

VPC Endpoints:
  S3 Gateway Endpoint (for application data)
  SSM Interface Endpoint (for Session Manager access)

Monitoring:
  VPC Flow Logs -> S3
  CloudWatch Alarms for CPU, status checks
  CloudTrail for API audit logging
  AWS Config for compliance rules
Security Best Practices Checklist
Network Security:
  [  ] VPC with separate public, private, and database subnets
  [  ] Security groups following least privilege
  [  ] NACLs for additional subnet-level protection where required
  [  ] VPC Flow Logs enabled
  [  ] No unnecessary public IP addresses
  [  ] VPC Endpoints for AWS service access from private subnets
  [  ] NAT Gateway per AZ for private subnet outbound access

Access Control:
  [  ] SSH key-based authentication only (no passwords)
  [  ] Session Manager preferred over SSH where possible
  [  ] Bastion host with restricted security group (if SSH needed)
  [  ] IAM roles on instances instead of embedded access keys
  [  ] MFA for administrative access
  [  ] SSH daemon hardened (non-default port, root login disabled)

Monitoring and Logging:
  [  ] CloudWatch monitoring enabled
  [  ] CloudTrail for API audit logging
  [  ] Security group change alerts
  [  ] Failed authentication monitoring
  [  ] Instance status check alarms with auto-recovery

Data Protection:
  [  ] EBS volumes encrypted at rest
  [  ] SSL/TLS for data in transit
  [  ] KMS keys for encryption management
  [  ] Regular backups with tested recovery

Compliance:
  [  ] AWS Config rules for security standards
  [  ] Regular security group audits
  [  ] Patch management process (Systems Manager Patch Manager)
  [  ] Incident response plan documented and tested
Summary
EC2 networking and security is about layered controls working together:
- VPCs provide network isolation. Plan your CIDR blocks carefully and use separate subnets for each tier.
- Security Groups are your primary firewall. Use least-privilege rules and reference other security groups instead of hardcoding IPs.
- NACLs add subnet-level deny rules. Remember they are stateless -- you must allow ephemeral ports for return traffic.
- Private subnets + NAT Gateways keep your instances off the public internet while allowing outbound access for updates.
- VPC Endpoints keep AWS service traffic on the private network.
- Session Manager eliminates the need for SSH keys, open ports, and bastion hosts.
- VPC Flow Logs give you visibility into all network traffic for security monitoring and troubleshooting.
- Defense in depth means no single control failure compromises your entire system.
In the next article, we will cover EC2 storage: EBS volume types, snapshots, instance store, and how to design storage architectures for performance and durability.
Go Deeper: The State of AWS Security 2026
This article is just the start. Get the full picture with our free whitepaper - 8 chapters covering IAM, S3, VPC, monitoring, agentic AI security, compliance, and a prioritized action plan with 50+ CLI commands.
Toc Consulting: AWS Security & Cloud Architecture
Want expert help with AWS Mastery?
Our team helps engineering teams secure and architect AWS the right way: assessment in week one, a prioritized action plan in week two.
More Articles
AWS Architecture Patterns: Proven Blueprints for Scalable Cloud Applications
Six production-proven AWS architecture patterns: three-tier web apps, serverless APIs, event-driven processing, static websites, data lakes, and multi-region disaster recovery with diagrams and implementation guides.
AWS Cost Optimization: Reduce Your Cloud Bill Without Sacrificing Performance
Complete guide to AWS cost optimization covering Cost Explorer, Compute Optimizer, Savings Plans, Spot Instances, S3 lifecycle policies, gp2 to gp3 migration, scheduling, budgets, and production best practices.
AWS AI and ML Services: Add Intelligence to Your Applications
Complete guide to AWS AI services including Rekognition, Comprehend, Textract, Polly, Translate, Transcribe, and Bedrock with CLI commands, pricing, and production best practices.